Page Redirection For Contact Form 7
This guide explains the Page Redirection For Contact Form 7 plugin. Please review it before installation. For support, contact [email protected].
Subscribe to our newsletter and enjoy up to 15% OFF on every product and exclusive offers.
This guide explains the Page Redirection For Contact Form 7 plugin. Please review it before installation. For support, contact [email protected].

Page Redirection for Contact Form 7 is a lightweight WordPress plugin that enhances the way Contact Form 7 handles successful form submissions. Instead of displaying only the default confirmation message on the same page, you can automatically redirect visitors to a specific page on your website or to an external URL after they submit a form successfully.
The plugin provides flexible redirection options that can be configured separately for each Contact Form 7 form. You can redirect visitors to an existing WordPress page, a custom post type, or any custom URL. You can also use third-party or campaign URLs, including links with UTM parameters, to support tracking and marketing campaigns.
For more control over the user experience, the plugin allows you to add a delay before redirection and display a confirmation message while the visitor waits. You can also use Conditional Rules to send visitors to different destinations based on the information submitted in specific form fields. In addition, you can choose how submitted form data is transferred using either a standard GET redirect or a POST request, with optional query string parameters.
Beyond redirection, Page Redirection for Contact Form 7 includes customizable Popup and Toaster notifications and a Webhook feature for sending successful form submissions to external services such as Google Sheets, GoHighLevel, and Slack. These features make it easier to provide clear submission feedback, manage different post-submission workflows, and connect Contact Form 7 with other services without requiring custom development for the plugin's built-in functionality.

Before installing Page Redirection For Contact Form 7, please ensure the following requirements are met:
Before using the Page Redirection For Contact Form 7 plugin, ensure that the Contact Form 7 plugin is already installed and activated on your WordPress website. Page Redirection for Contact Form 7 works as an extension of the Contact Form 7 plugin and cannot function independently.
You can install the Page Redirection for Contact Form 7 plugin just like any other WordPress plugin. You can find it in the WordPress.org plugin directory. The easiest method is to install it directly from the WordPress dashboard.
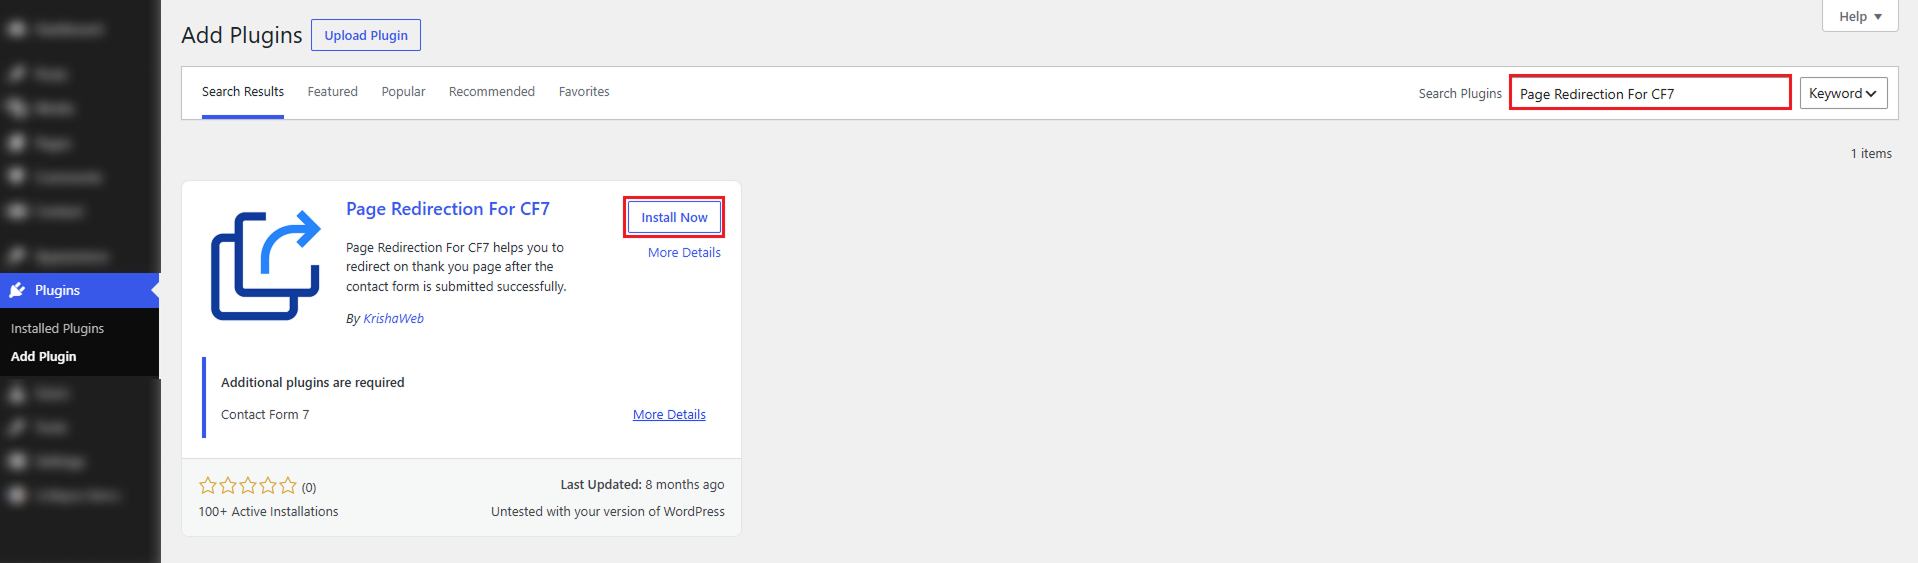
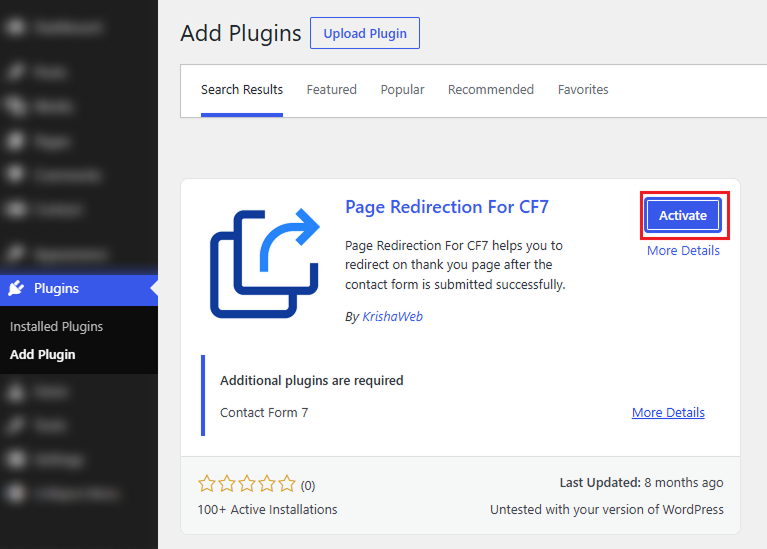
Once it's installed, click on the Activate button. Once activated, the plugin is ready to use.
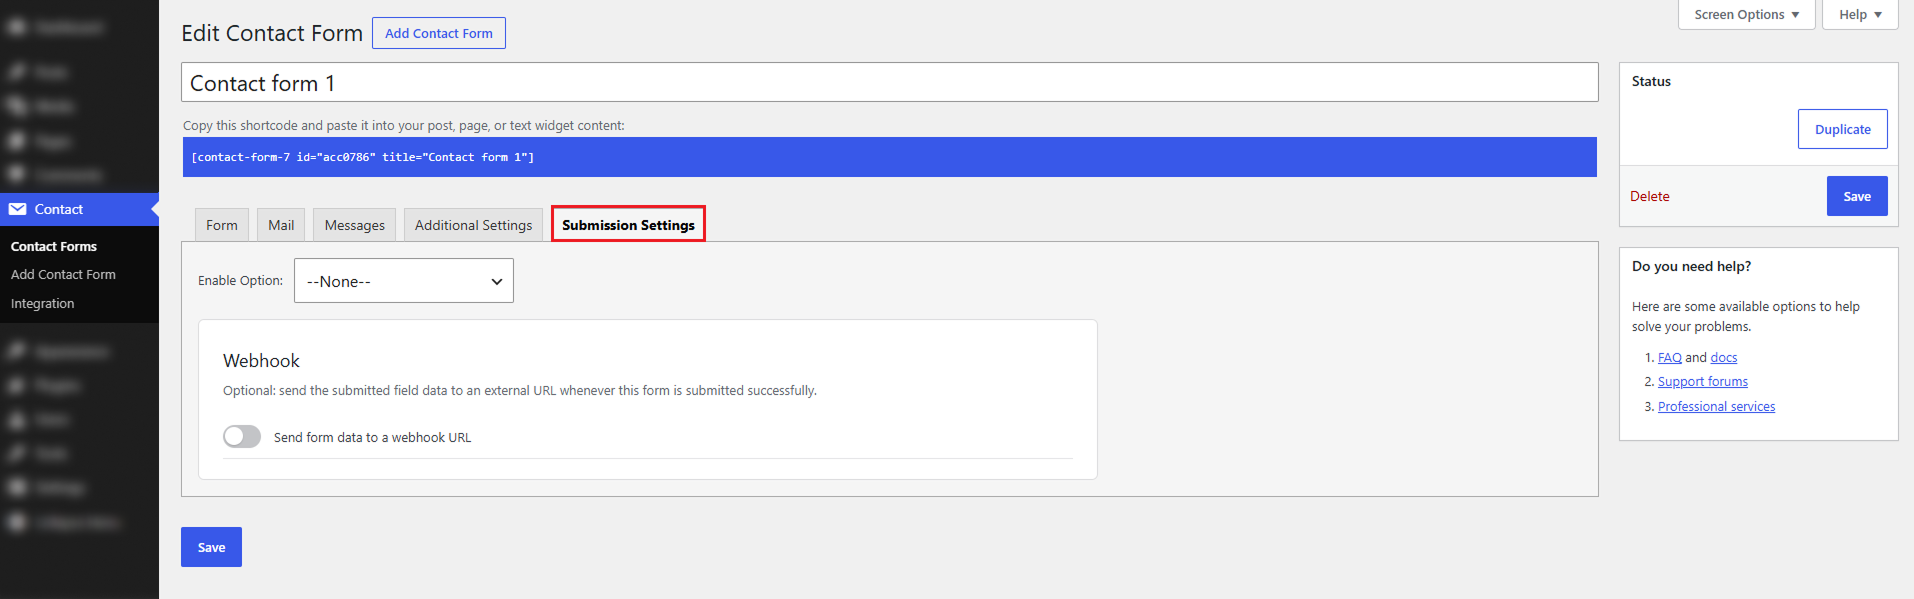
After activating Page Redirection for Contact Form 7, to access the Submission Settings:
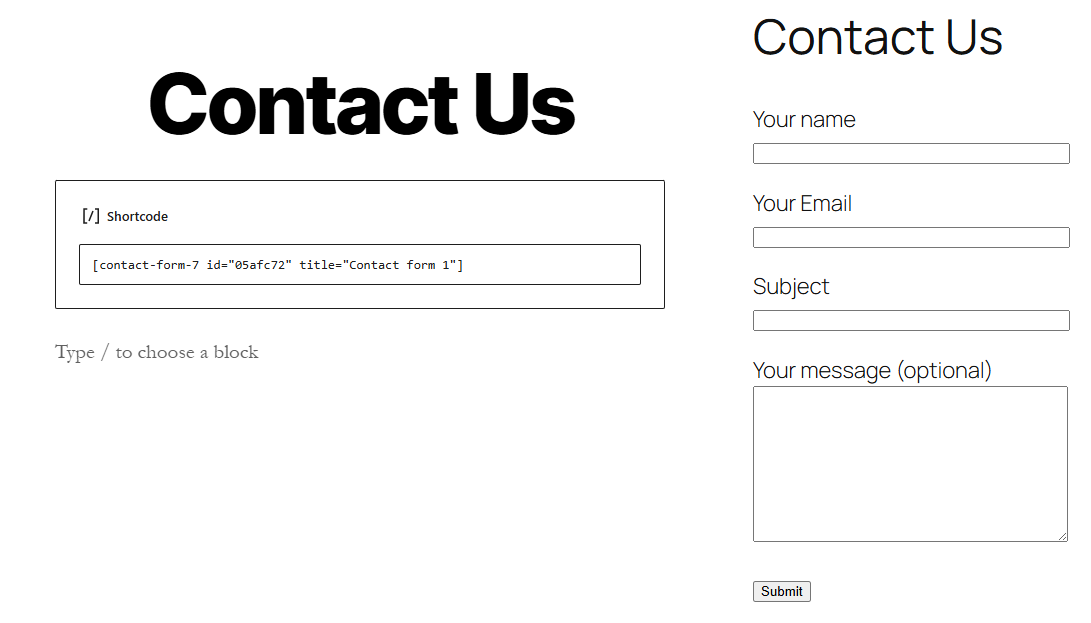
First, we created a Contact Us page and added a shortcode for the contact form, which appears on the frontend. After the user submits the form, they are redirected to a specific page.
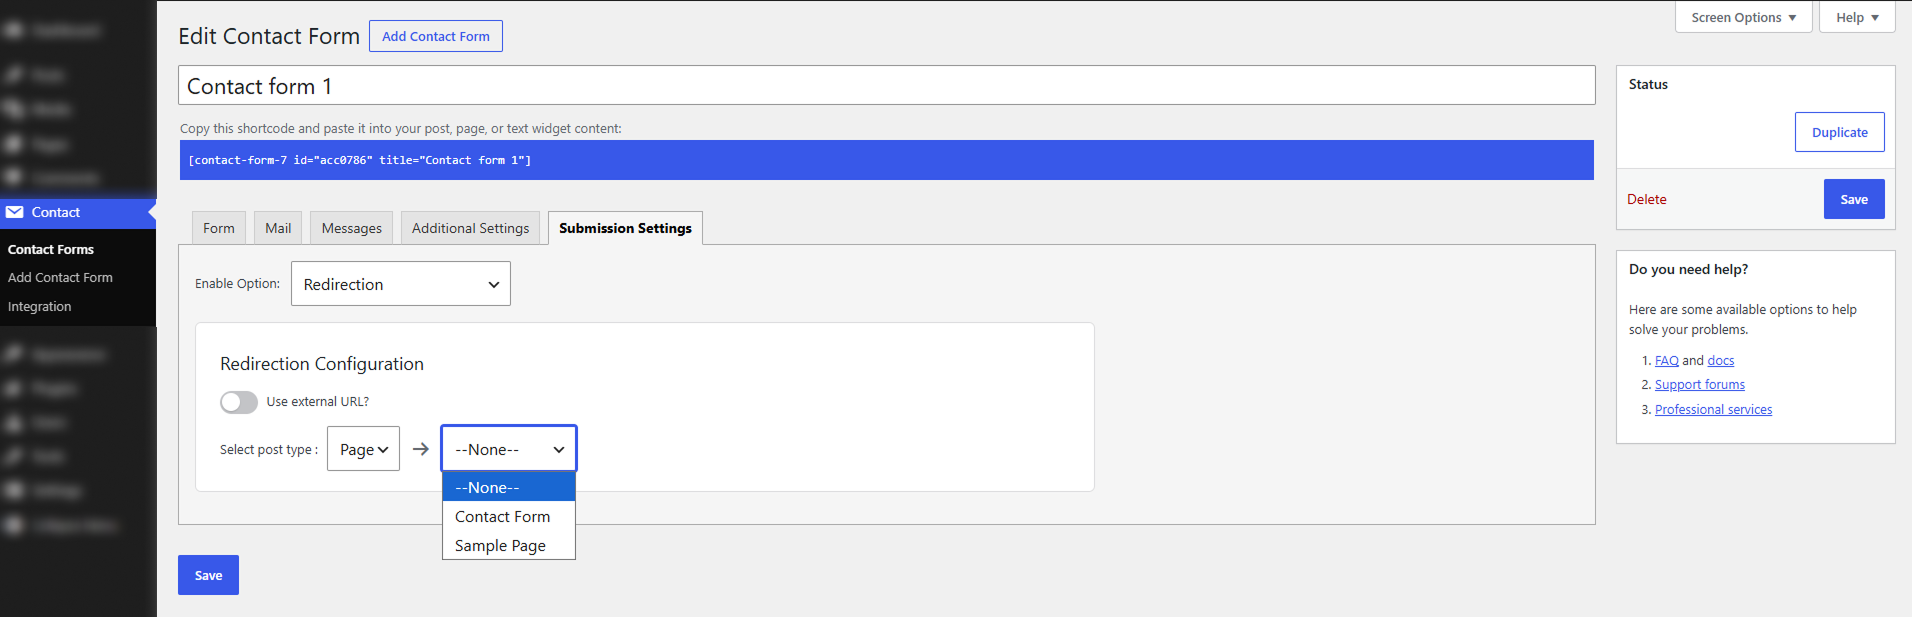
When this option is selected, the user will be redirected to a page within your website after submitting the form. You can choose any existing page (such as a Thank You page) from the dropdown list.
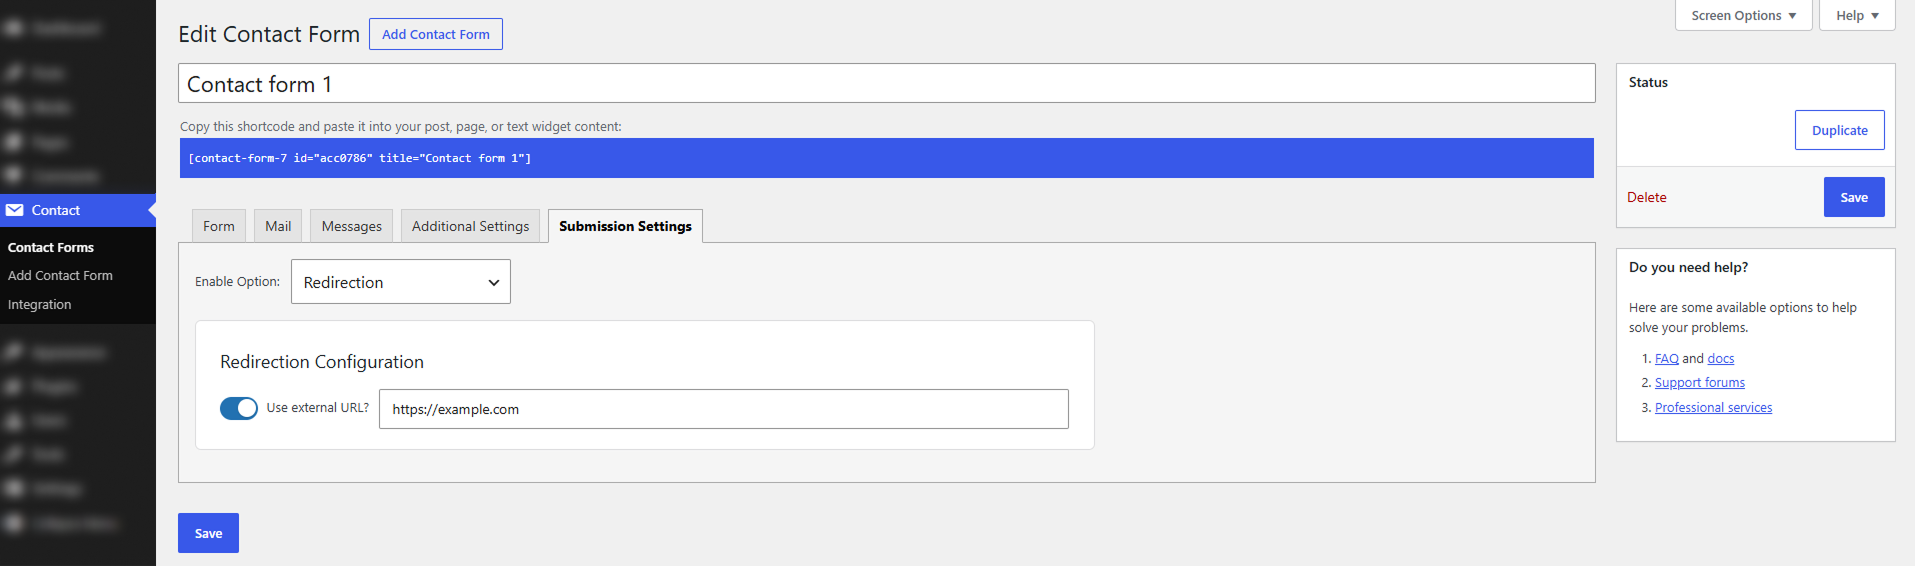
When this option is selected, the user will be redirected to an external website after submitting the form. Enter the full URL (for example, https://example.com) where the user should be sent.
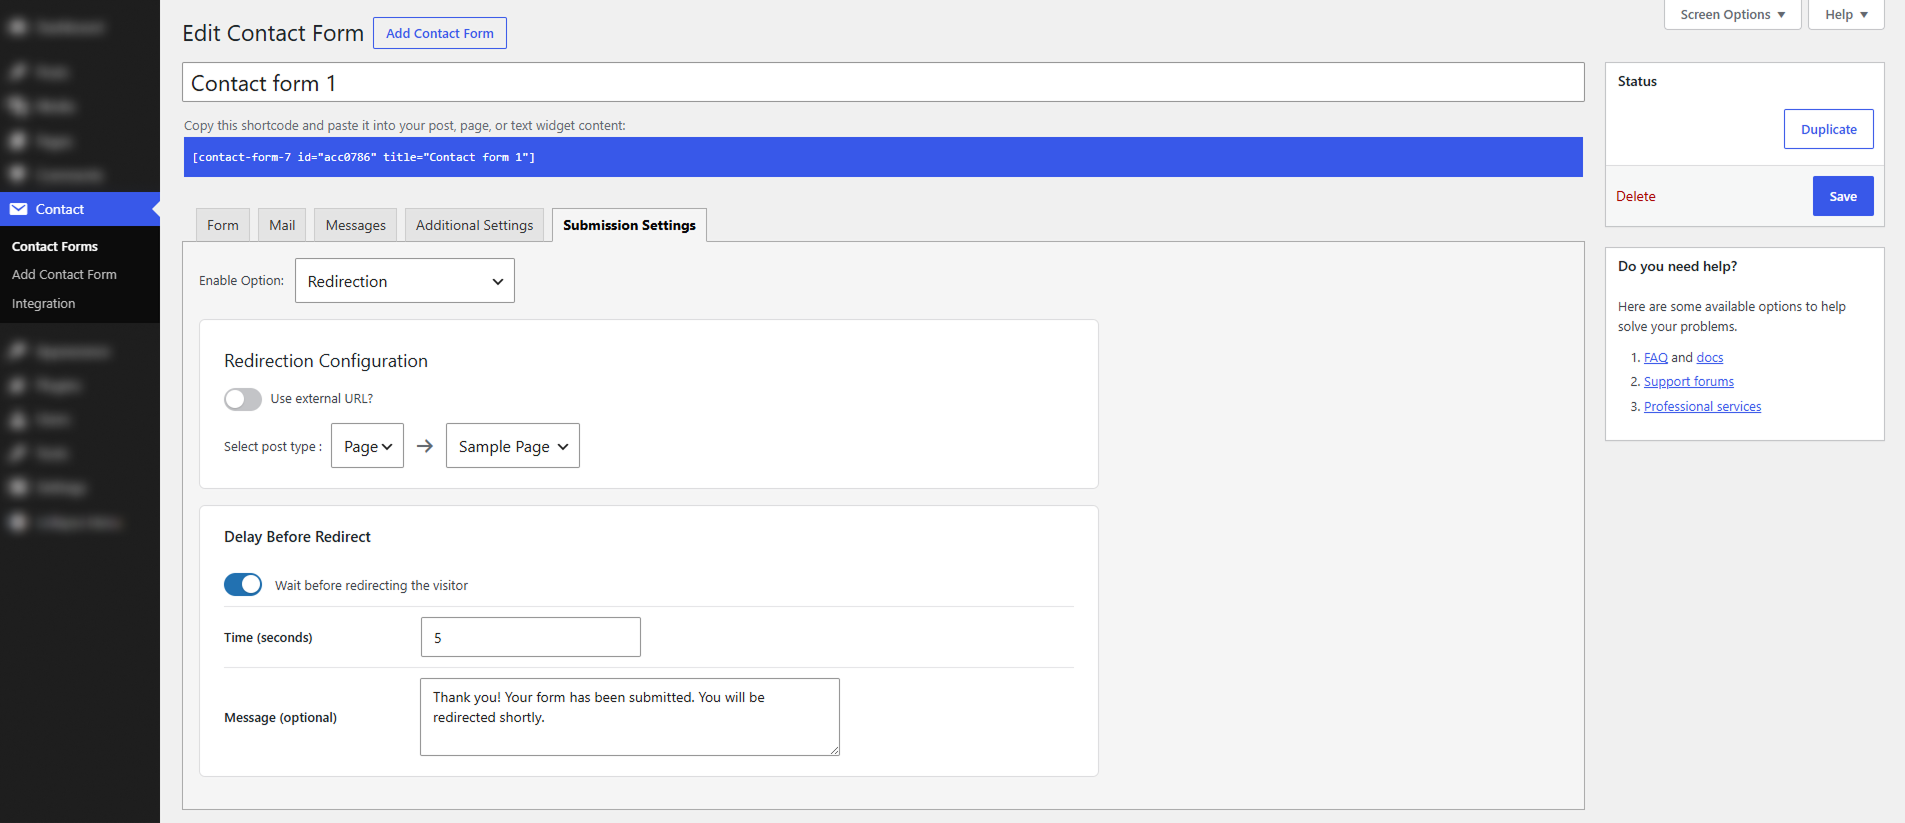
The Delay Before Redirect option allows you to keep the visitor on the current page for a short period after the Contact Form 7 form has been successfully submitted. Instead of redirecting the visitor immediately, you can choose how many seconds they should wait before being sent to the configured destination.
This option is useful when you want to give visitors a moment to see a confirmation message before they leave the page. During the waiting period, you can also display a small toast notification to let the visitor know that their submission was successful and that they will be redirected shortly.
How to Enable the Delay
To use this feature, enable Wait before redirecting the visitor in the Delay Before Redirect section. After enabling the option:
What Happens After Submission?
When the delay is enabled, the visitor follows this sequence:
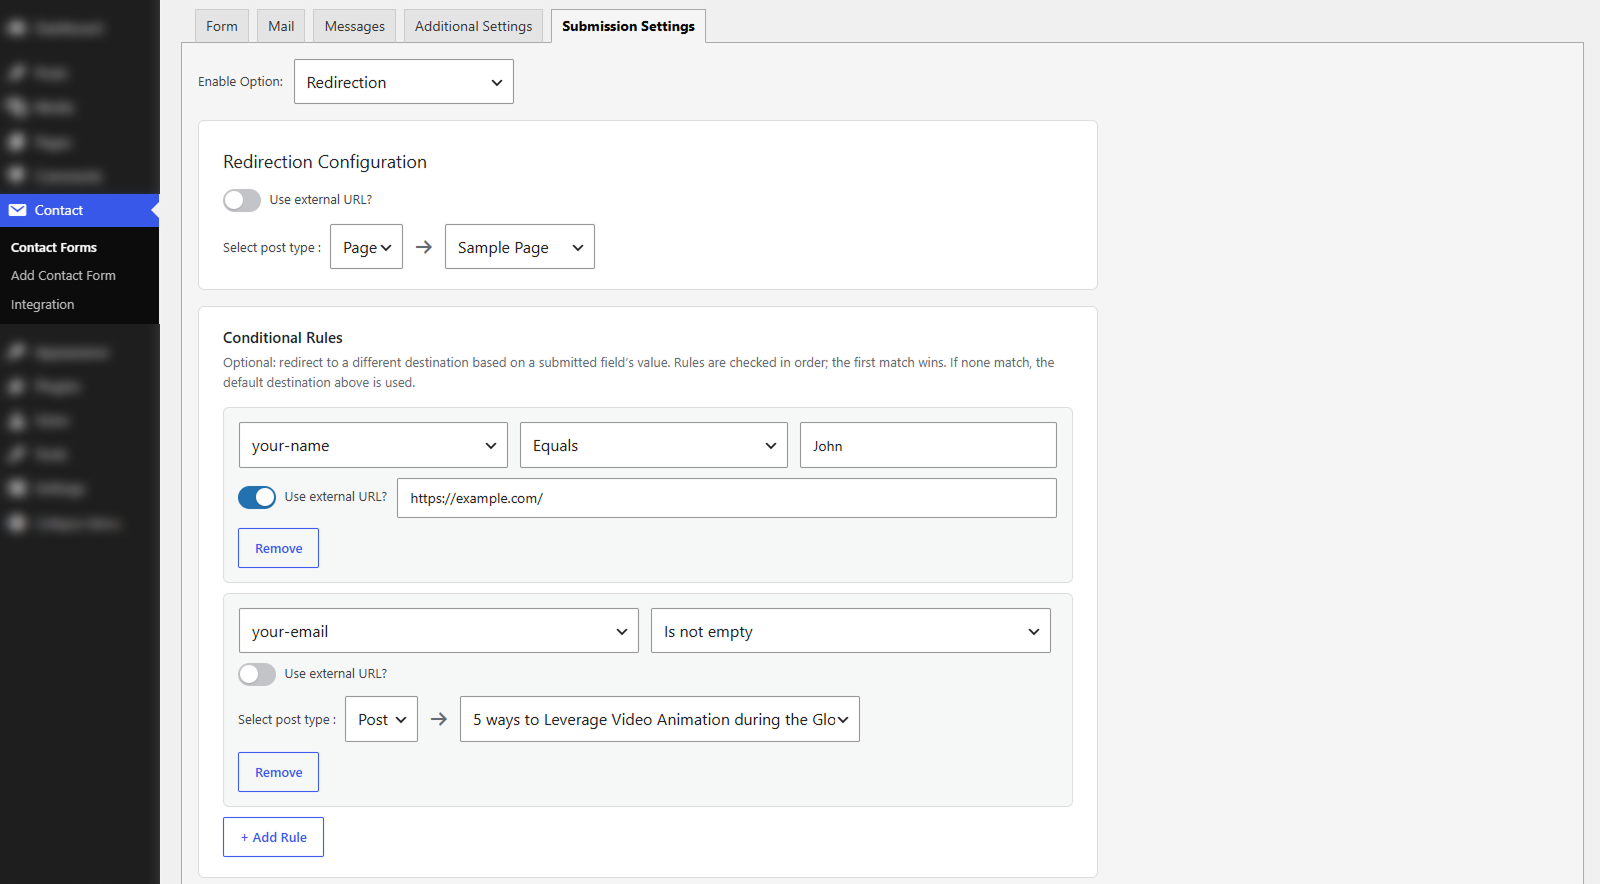
The Conditional Rules feature allows you to send visitors to different destinations depending on the information they submit in the contact form.
This is useful when one contact form is used for different types of visitors or requests. Instead of sending everyone to the same page, you can create rules that check a submitted field and redirect the visitor to the appropriate destination.
For example, you could create a rule that sends visitors to a specific page when a selected form field contains a particular value.
How Conditional Rules Work
Each rule checks information submitted through a Contact Form 7 field. To create a rule:
The Field dropdown automatically lists the fields available in your Contact Form 7 form, making it easier to select the field you want to check.
Select a Field
The Field dropdown is used to select the Contact Form 7 field that the rule should check. For example, your form may contain fields such as: Name, Email, and Message. Select the field whose submitted value should determine the redirect.
Select a Condition
After selecting a field, choose how the plugin should check its submitted value. The available conditions are:
Enter a Value
The value field is displayed when the selected condition requires a value for comparison. You need to enter a value when using conditions such as Equals, Not equals, Contains, Does not contain.
For example, if you select:
The rule checks the submitted value of your-name against John.
Conditions Without a Value
The Value field is not required when you select: Is empty, and Is not empty. For these conditions, the plugin only needs to determine whether the selected field contains a value or does not contain a value.
Multiple Conditional Rules
You can add more than one rule by clicking + Add Rule. Each rule can have different fields, conditions, values, and redirect destinations.
This allows you to create different redirect paths for different form submissions. For example:
Rule 1
Rule 2
With these rules, visitors who submit Sales can be sent to the Sales page, while visitors who submit Support can be sent to the Support page.
Rule Order Is Important
Conditional Rules are checked in the order in which they appear. The plugin starts with the first rule and checks each rule one by one. As soon as it finds the first matching rule, the visitor is redirected to that rule's destination. The plugin does not continue checking the remaining rules after a match is found.
If the visitor's submitted information does not match any of the Conditional Rules, the plugin uses the default destination configured in the Redirection Configuration section. This gives you a fallback destination for submissions that do not meet any of your conditions.
The overall process is:
The Redirect Method setting gives you control over how Contact Form 7 data is sent to the destination after a successful form submission. You can choose how the form fields are transferred, and use the Open destination page in a new tab option to control how the destination page opens.
This setting provides two methods for sending the submitted form data:
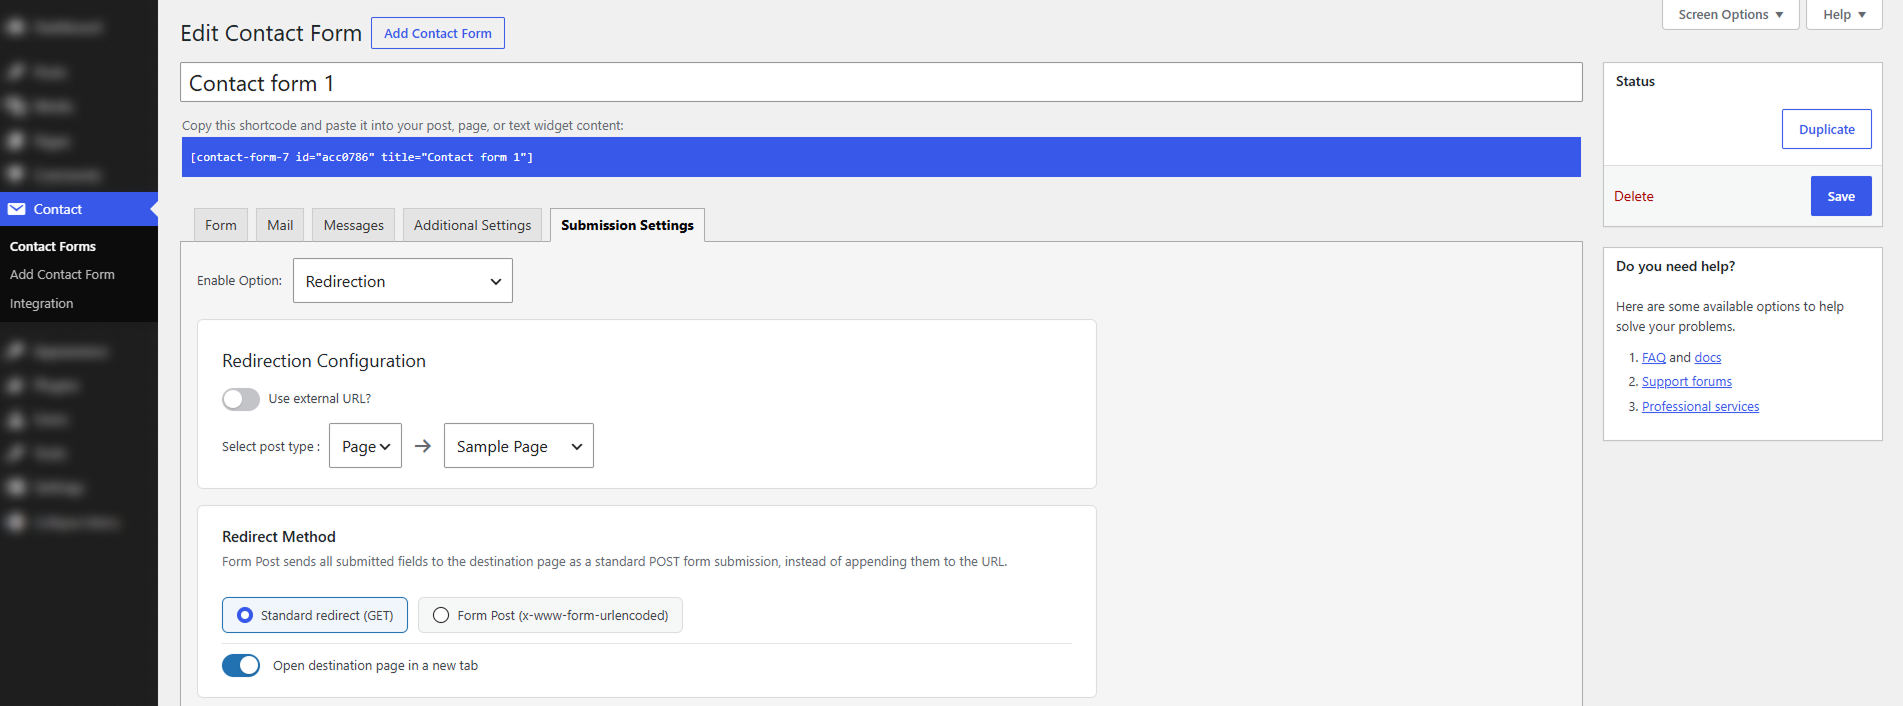
Standard Redirect (GET)
Standard redirect (GET) sends the visitor to the configured destination using the browser's normal navigation (a GET request), the same way a regular link click or wp_redirect would.
By itself, this method does not add anything to the destination URL - it simply navigates to the destination as configured. If you also want the submitted form values to be appended to that URL as query parameters, enable the separate Query String Parameters setting described below.
Choose Standard redirect (GET) when:
Form Post (x-www-form-urlencoded)
Form Post (x-www-form-urlencoded) sends the submitted form fields to the destination as an HTTP POST request instead of a GET redirect.
Under the hood, this works by dynamically building a hidden HTML form on the page (method="POST", enctype="application/x-www-form-urlencoded"), populating it with the submitted field values as hidden inputs, and submitting it in the visitor's browser. The destination page therefore receives the data as POST parameters rather than as part of the URL, so the destination URL itself stays clean.
Because this is a real form submission, the Query String Parameters setting does not apply in this mode - it is only relevant to Standard redirect (GET).
Choose Form Post (x-www-form-urlencoded) when:
Open Destination Page in a New Tab
The Open destination page in a new tab option controls where the destination opens once the redirect (or form post) fires.
This option applies to both delivery methods: for Standard redirect it opens the destination URL in a new tab, and for Form Post it submits the hidden form with its target set to open a new tab.
Choosing the Right Redirect Method
The Query String Parameters setting lets you pass submitted Contact Form 7 field values to the destination page as URL query parameters. It only applies when Redirect Method is set to Standard redirect (GET) - it has no effect when Form Post is selected, since that method sends data as POST body fields, not as part of the URL.
This is useful when the destination page needs access to information the visitor entered in the form - for example, passing along a name, email address, subject, or message so the visitor doesn't have to re-enter it.
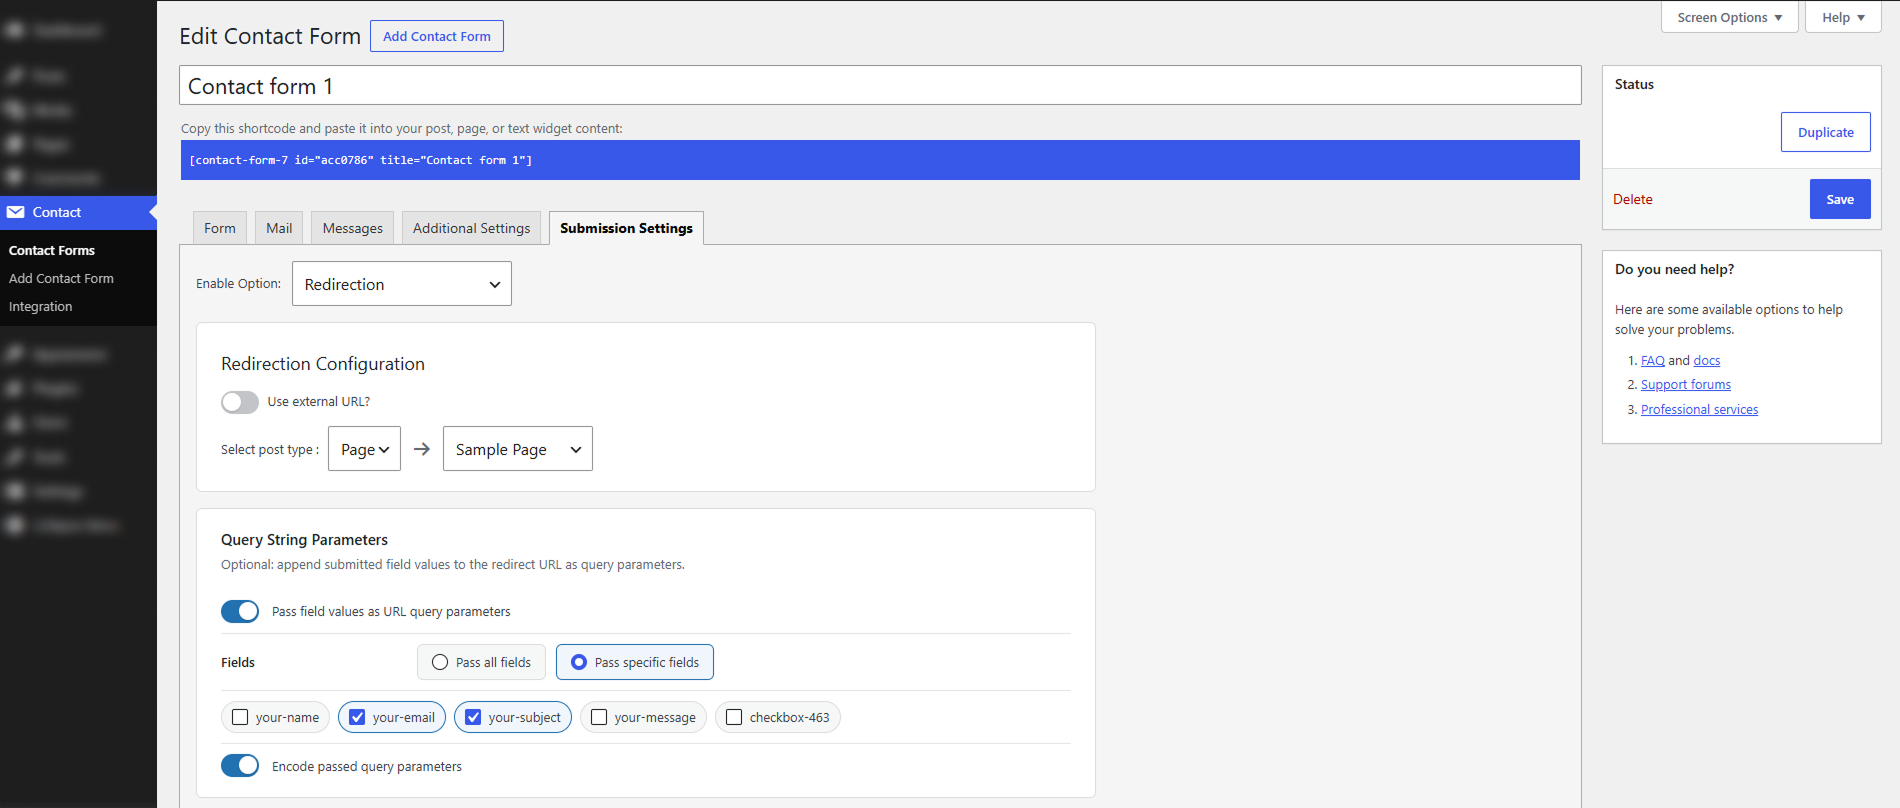
Pass Field Values as URL Query Parameters
The Pass field values as URL query parameters toggle controls whether submitted form values are added to the redirect URL at all. It is off by default, so selecting Standard redirect (GET) on its own does not add any query parameters - this toggle must also be enabled.
When enabled:
When disabled, no submitted values are added to the destination URL, regardless of the redirect method.
Choose Which Fields to Pass
Once Pass field values as URL query parameters is enabled, choose one of two modes:
Encode Passed Query Parameters
The Encode passed query parameters option (enabled by default) URL-encodes each value before it's appended to the destination URL. This matters whenever a submitted value contains spaces, symbols, or other characters that have special meaning in a URL - without encoding, such characters could break the URL or be misinterpreted by the destination page.
It's recommended to leave Encode passed query parameters enabled for reliable transfer of submitted values.
Suppose your form has fields for Name, Email, Subject, and Message, and you want to redirect visitors to another page, passing only their email and subject. Configure:
After a successful submission, the visitor is redirected to the destination URL with your-email and your-subject appended as encoded query parameters, ready for the destination page to read.
How It Works
Normally, when someone fills out your Contact Form 7 form, you just get an email. The Webhook feature lets you also automatically send that submission to another app - a spreadsheet, a CRM, a Slack channel - the moment someone submits the form. No email forwarding, no manual copy-pasting.
You'll find it here: Contact → (open your form) → Submission Settings tab → Webhook section.
Turn on "Send form data to a webhook URL", and you'll see:
Three destinations are built in and ready to use with no coding: Google Sheets, GoHighLevel, and Slack. If you use a different app (like HubSpot or Mailchimp), a developer can add support for it — see the developer section below.
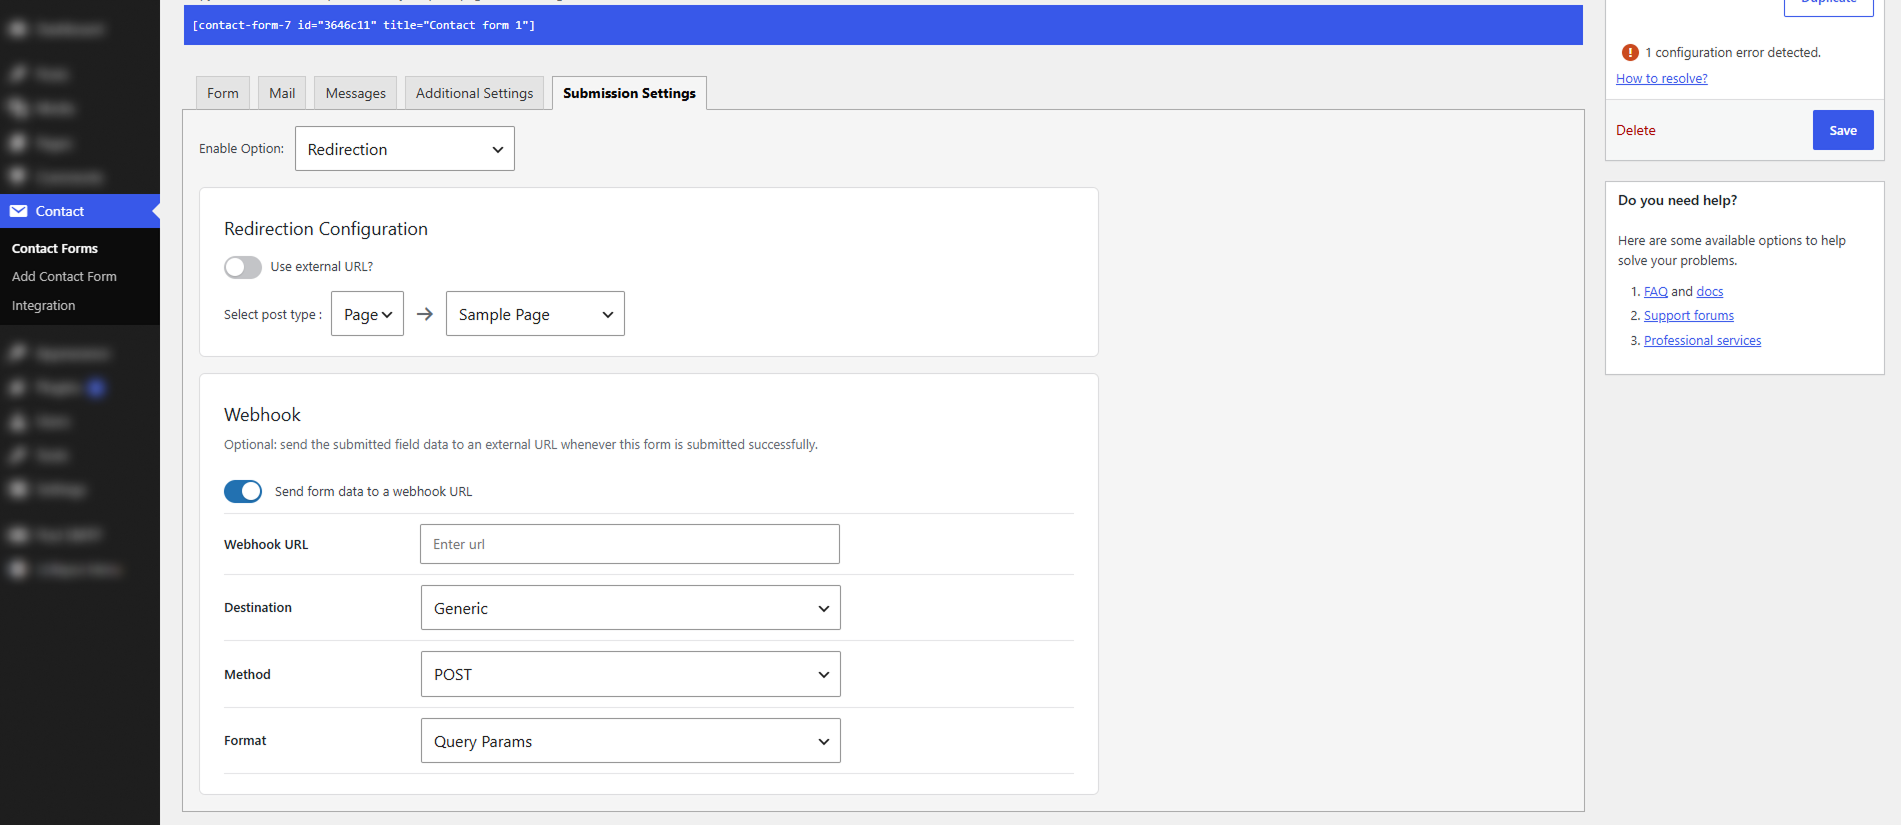
Sending submissions to a Google Sheet
function doPost(e) {
     var sheet = SpreadsheetApp.getActiveSpreadsheet().getActiveSheet();
     var data = JSON.parse(e.postData.contents);
     sheet.appendRow([data.Name, data.Email]);
     return ContentService.createTextOutput('OK');
   }
If your columns aren't called "Name" and "Email", change those two words in the snippet to match, and add more data.YourColumnName entries for extra columns.
That's it — submit a test entry through your form and check the row appears in the sheet.
Sending submissions to GoHighLevel
Sending submissions to Slack
hooks.slack.com/services/... — copy it.New submission from {your-name}: {your-message}For developers: adding a new destination
Anything not listed above — HubSpot, Mailchimp, Salesforce, or any other API — can be added with two WordPress filters, no changes to this plugin's own files. Add the code below to your theme's functions.php or a small custom plugin.
Data available to your code
Settings are stored in post meta cf7_redirect_setting, under webhook:
array(
	'webhook' => array(
		'enabled'         => 'on',
		'url'             => 'https://...',        // set by the site admin in the Webhook card
		'destination'     => 'generic',             // 'generic' | 'google_sheets' | 'gohighlevel' | 'slack' | your custom key
		'field_map'       => array( 'your-name' => 'Name' ), // used by google_sheets/gohighlevel
		'message_template' => 'New lead: {your-name}',       // used by slack
	),
)
Dispatch happens in includes/class-cf7-thank-you-page.php, method cf7_redirect_send_webhook(), hooked to CF7's wpcf7_mail_sent action (fires only on a successful submission, non-blocking). $posted_data is WPCF7_Submission::get_instance()->get_posted_data() — an array keyed by CF7 field tag name.
Selecting any destination other than generic always forces the request to POST + Content-Type: application/json.
Filter 1 — register the destination in the dropdown
/**
 * @param array<string,string> $destinations Existing destination_key => label pairs.
 * @return array<string,string>
 */
add_filter( 'cf7_redirect_webhook_destinations', function ( array $destinations ): array {
	$destinations['hubspot'] = 'HubSpot';
	return $destinations;
} );
Without this, a destination key your code introduces won't validate and will silently save as generic. Always pair it with Filter 2.
Filter 2 — build the request for that destination
/**
 * @param array               $args         WP_Http args (has 'blocking' => false, 'timeout' => 5 already set).
 *                                          Set $args['body'] (string) and $args['headers'] (array).
 * @param string              $destination  The currently selected destination key.
 * @param array<string,mixed> $posted_data  Raw CF7 submitted field data, keyed by field name.
 * @param WPCF7_ContactForm   $contact_form The form object that was submitted.
 * @param array               $setting      The full saved cf7_redirect_setting array (shape above).
 * @return array Modified $args, passed straight to wp_safe_remote_post().
 */
add_filter( 'cf7_redirect_webhook_request_args', function ( array $args, string $destination, array $posted_data, $contact_form, array $setting ): array {
	if ( 'hubspot' !== $destination ) {
		return $args; // leave every other destination untouched.
	}

	$access_token = getenv( 'HUBSPOT_ACCESS_TOKEN' ); // from a HubSpot Private App, not stored in the plugin UI.

	$args['headers']['Content-Type']  = 'application/json';
	$args['headers']['Authorization'] = 'Bearer ' . $access_token;
	$args['body']                     = wp_json_encode( array(
		'properties' => array(
			'email'     => $posted_data['your-email'] ?? '',
			'firstname' => $posted_data['your-name'] ?? '',
			'phone'     => $posted_data['your-phone'] ?? '',
			'message'   => $posted_data['your-message'] ?? '', // a custom contact property you've created in HubSpot.
		),
	) );

	return $args;
}, 10, 5 );
The site admin's Webhook URL field is still what the request is sent to — this filter only reshapes the body/headers for that URL. If the API needs auth (a token, API key, Basic Auth), add it to $args['headers'] here, sourced from a constant/env var — never from the plugin's admin UI.
Worked example — HubSpot: HubSpot's CRM API needs a real access token, even on the free tier — there's no anonymous/no-auth submission endpoint anymore.
Get one from HubSpot → Settings → Integrations → Private Apps → Create a private app, with the crm.objects.contacts.write scope, and copy its access token.
Admin's Webhook URL: https://api.hubapi.com/crm/v3/objects/contacts. The filter above adds the Authorization: Bearer header and reshapes the body to HubSpot's {properties: {...}} schema — email/firstname/lastname/phone are built-in contact properties; anything else (like message) needs to be created as a custom property in HubSpot first, or the API will reject the request.
Worked example — Mailchimp (needs auth, different shape entirely):
add_filter( 'cf7_redirect_webhook_destinations', function ( array $destinations ): array {
	$destinations['mailchimp'] = 'Mailchimp';
	return $destinations;
} );

add_filter( 'cf7_redirect_webhook_request_args', function ( array $args, string $destination, array $posted_data ): array {
	if ( 'mailchimp' !== $destination ) {
		return $args;
	}

	$api_key = getenv( 'MAILCHIMP_API_KEY' );

	$args['headers']['Content-Type']  = 'application/json';
	$args['headers']['Authorization'] = 'Basic ' . base64_encode( 'anystring:' . $api_key );
	$args['body']                     = wp_json_encode( array(
		'email_address' => $posted_data['your-email'] ?? '',
		'status'        => 'subscribed',
		'merge_fields'  => array( 'FNAME' => $posted_data['your-name'] ?? '' ),
	) );

	return $args;
}, 10, 3 );
Admin's Webhook URL for this one: https://<dc>.api.mailchimp.com/3.0/lists/<list_id>/members/.
Debugging failed requests
add_action( 'cf7_redirect_webhook_failed', function ( int $form_id, WP_Error $response, string $url ): void {
	error_log( "Webhook failed for form {$form_id} ({$url}): " . $response->get_error_message() );
}, 10, 3 );
With WP_DEBUG enabled, failures are also logged automatically without any extra code.
The Popup option allows you to show a stylish pop-up message after a Contact Form 7 form is successfully submitted. Instead of redirecting users to another page, this option displays a confirmation pop-up on the same page, helping users instantly know that their form has been submitted successfully. You can fully customize the pop-up content, buttons, colors, and timing based on your needs.
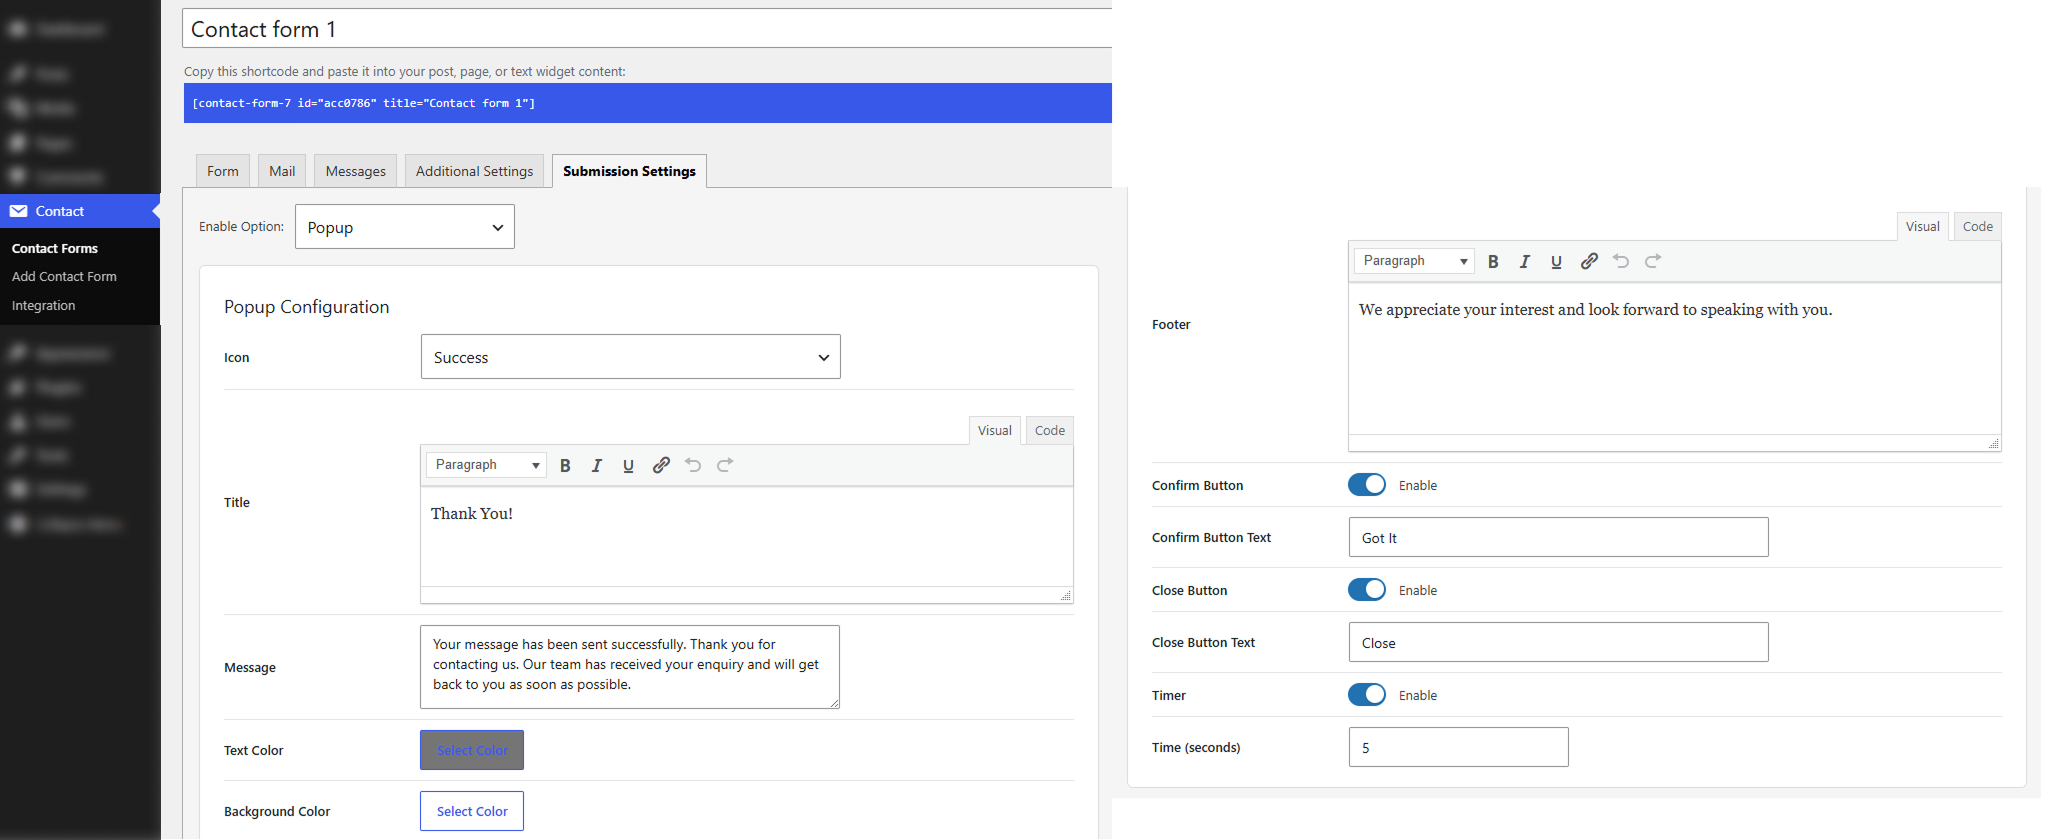
The toaster option displays a small, non-intrusive toast notification after a Contact Form 7 form is submitted successfully. Unlike pop-up, toast messages appear at a selected position on the screen and do not block the page content. This option is ideal for showing quick confirmation messages while keeping users on the same page.
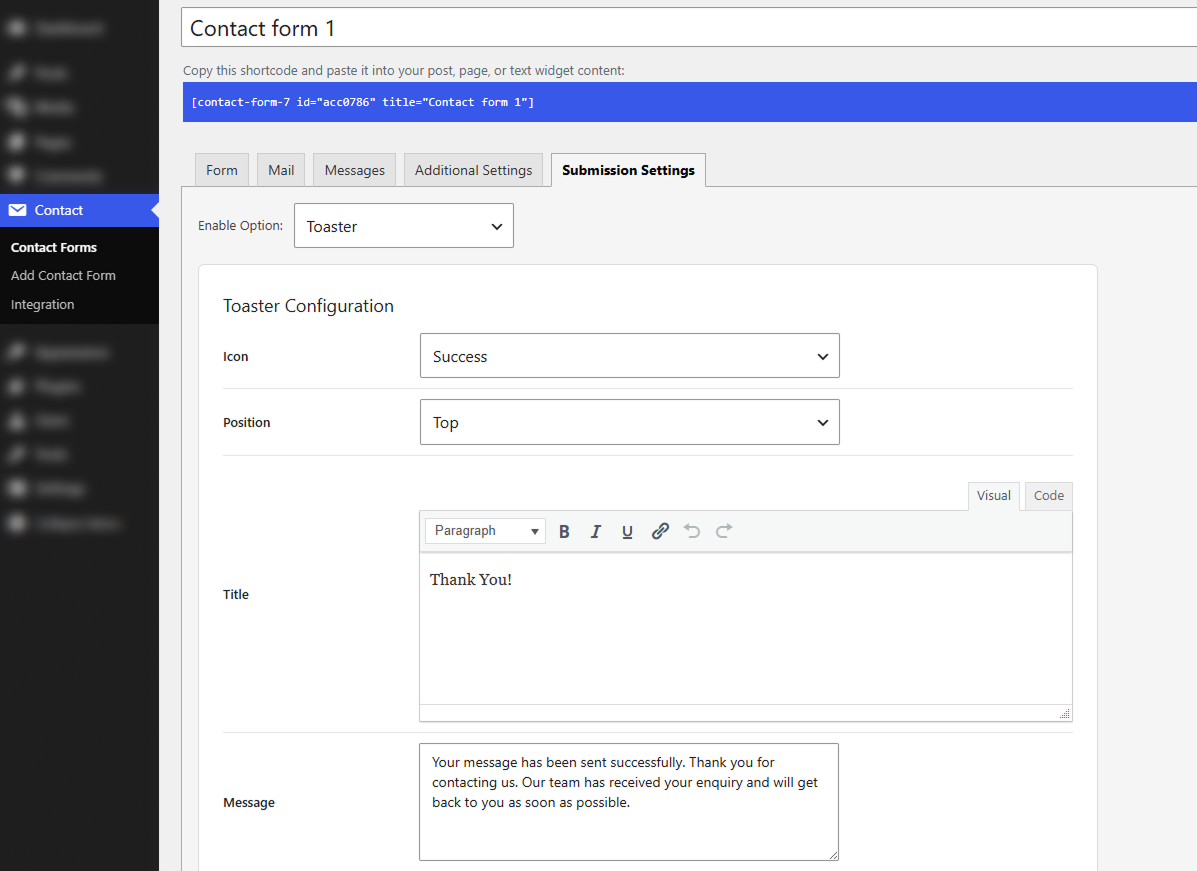
All configuration fields in the toaster options are the same as the pop-up configuration section. The only additional setting is the position option, which controls where the toast message appears on the screen.
If you've followed the steps outlined in this guide and still need assistance, please don't hesitate to contact our support team. E-mail us at [email protected] — we're here to help!