LicenseCommerce
This guide explains the LicenseCommerce plugin. Please review it before installation. For support, contact [email protected].
Subscribe to our newsletter and enjoy up to 15% OFF on every product and exclusive offers.
This guide explains the LicenseCommerce plugin. Please review it before installation. For support, contact [email protected].

LicenseCommerce is a powerful and user-friendly WordPress plugin designed to help website owners efficiently manage software licenses and customer access from a single platform. Whether you are selling digital products, software applications, or subscription-based services, the plugin provides a streamlined solution to generate, distribute, and track license keys with ease. It eliminates the need for manual license handling and reduces the chances of errors, making it an essential tool for businesses of all sizes.
Built with flexibility in mind, LicenseCommerce seamlessly integrates with your existing WordPress setup and supports automated workflows for license generation and delivery. The plugin allows you to create unique license keys for each purchase, assign them to customers, and check their status (active, inactive, and expired) directly from the admin dashboard. This ensures better control over your product distribution and enhances overall security.
LicenseCommerce also includes features for monitoring and validating license usage, helping you prevent unauthorized access and misuse of your digital products. With built-in license verification capabilities, you can connect your applications or services to validate licenses in real time. This not only protects your business but also builds trust with your customers by ensuring a secure and reliable licensing system.
Before installing LicenseCommerce, please ensure the following requirements are met:
Before using the LicenseCommerce plugin, ensure that the WooCommerce plugin is already installed and activated on your WordPress website. LicenseCommerce works as an extension of the WooCommerce plugin and cannot function independently.
Once the admin enters a valid license key, the user can access and use all the features of the LicenseCommerce plugin.
When you buy the LicenseCommerce plugin from the KrishaStore website, you will receive your license key by email from Freemius. This license key is required to activate LicenseCommerce features within your WordPress admin panel.
The LicenseCommerce activation process helps you set up the dashboard and connect your software with the licensing system. After purchasing from the KrishaStore website, you will receive a LicenseFlow.zip file that contains all the required components to get started.
This process involves two main steps:
By completing these steps, you will be able to sell your software, manage license keys, validate users, and automate subscription billing smoothly.
After extracting the LicenseCommerce.zip file, you will find the following files:
Step 1: Extract the ZIP File
Step 2: Prepare the Plugin File
Step 3: Install the Plugin in WordPress
Step 4: Activate License Key
After setting up the LicenseCommerce Dashboard, the next step is to integrate your software with the LicenseCommerce SDK. This integration allows your product to communicate with the LicenseCommerce system for license validation, subscription handling, and feature control.
The SDK is provided inside the licenseflow-sdk.zip file, which you received along with the LicenseCommerce package.
Step 1: Extract the SDK Files
After extraction, you will find the following:
1. composer-sample.json (Composer Setup)
This file helps you integrate the SDK using Composer, which is a dependency manager for PHP.
When to Use Composer
How to Set It Up
composer installThe SDK will be automatically installed and loaded. You can now use it in your project via Composer's autoload system.
If You Are Not Using Composer
2. INTEGRATION.md (Integration Guide)
This is the most important file for developers. It provides detailed instructions on how to integrate the LicenseCommerce SDK into your software.
What It Includes
How to Use It
Your software will be connected to LicenseCommerce. License validation and subscription checks will work automatically.
3. LICENSE File
Contains the legal terms and conditions for using the SDK. Make sure you review it before using the SDK in your product. This integration ensures your software is fully equipped with secure and automated license management capabilities.
When a customer purchases your subscription-based software from your WooCommerce store and installs it on their WordPress website, your software must verify the license with your store. This ensures that only valid users can access the software and its features.
To enable this communication, you need to configure the LicenseCommerce SDK by updating a specific file called LicenseIntegration.php, located inside the src folder. This file contains important settings that connect your software to your WooCommerce store for license validation and subscription management.
Step 1: Locate the File
Step 2: Identify Key Variables
Inside the file, you will find two important variables: API_URL and RENEW_URL. These variables define how your software communicates with your WooCommerce store.
Step 3: Update API_URL (License Validation Endpoint)
Purpose: Used to verify license keys with your store.
API_URL = 'https://store.example.com/wp-json/store/v1/validate-license';This URL connects your software to your WooCommerce store. When a user enters a license key, your software sends a request to this endpoint, and the store responds with the license status (valid, expired, etc.).
Step 4: Update RENEW_URL (Subscription/Renewal Link)
Purpose: Redirects users to renew or manage their subscription.
RENEW_URL = 'https://store.example.com/';To ensure that recurring payments (subscriptions) work smoothly in WooCommerce, you need to configure a few important settings. These settings help automate billing, improve the checkout experience, and ensure proper communication between WooCommerce and your payment gateway (Stripe).
Path: WooCommerce → Settings → Products → Downloadable Products
This section controls how digital products (such as software downloads or subscription-based products) are delivered to customers.
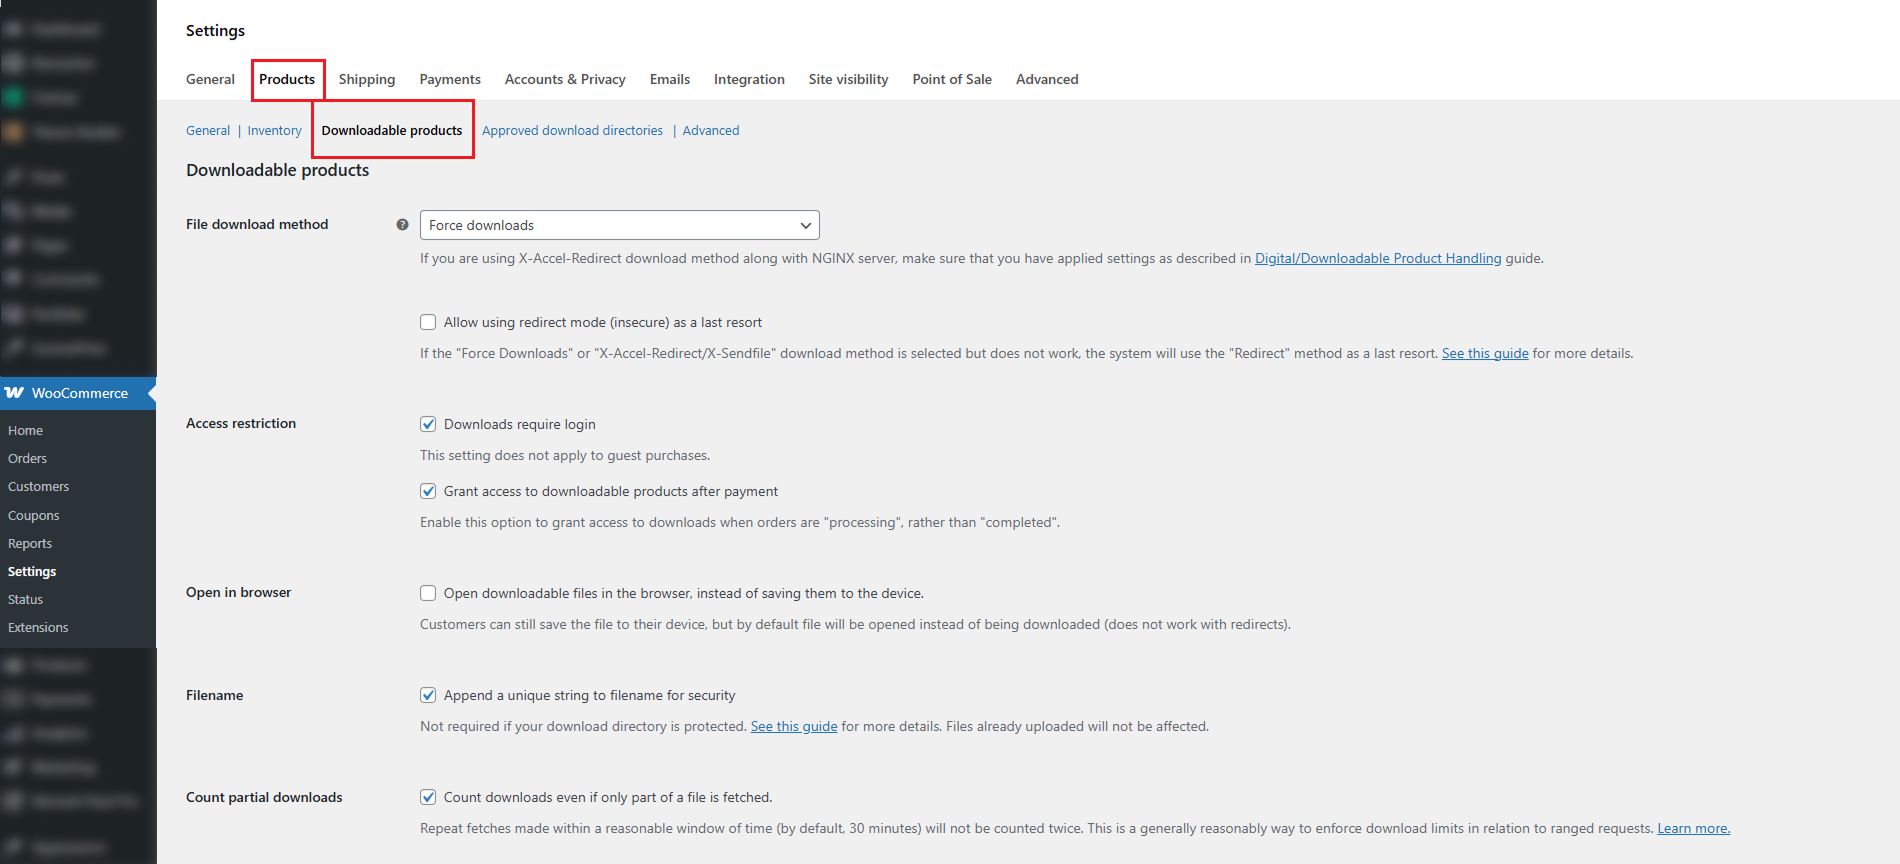
Why This Matters: Ensures secure delivery of downloadable files, prevents unauthorized access to your software files, and works well with subscription-based digital products.
Path: WooCommerce → Settings → Accounts & Privacy
This section manages how customer accounts are created and used during checkout. Since subscriptions require ongoing user access, having a proper account setup is essential.
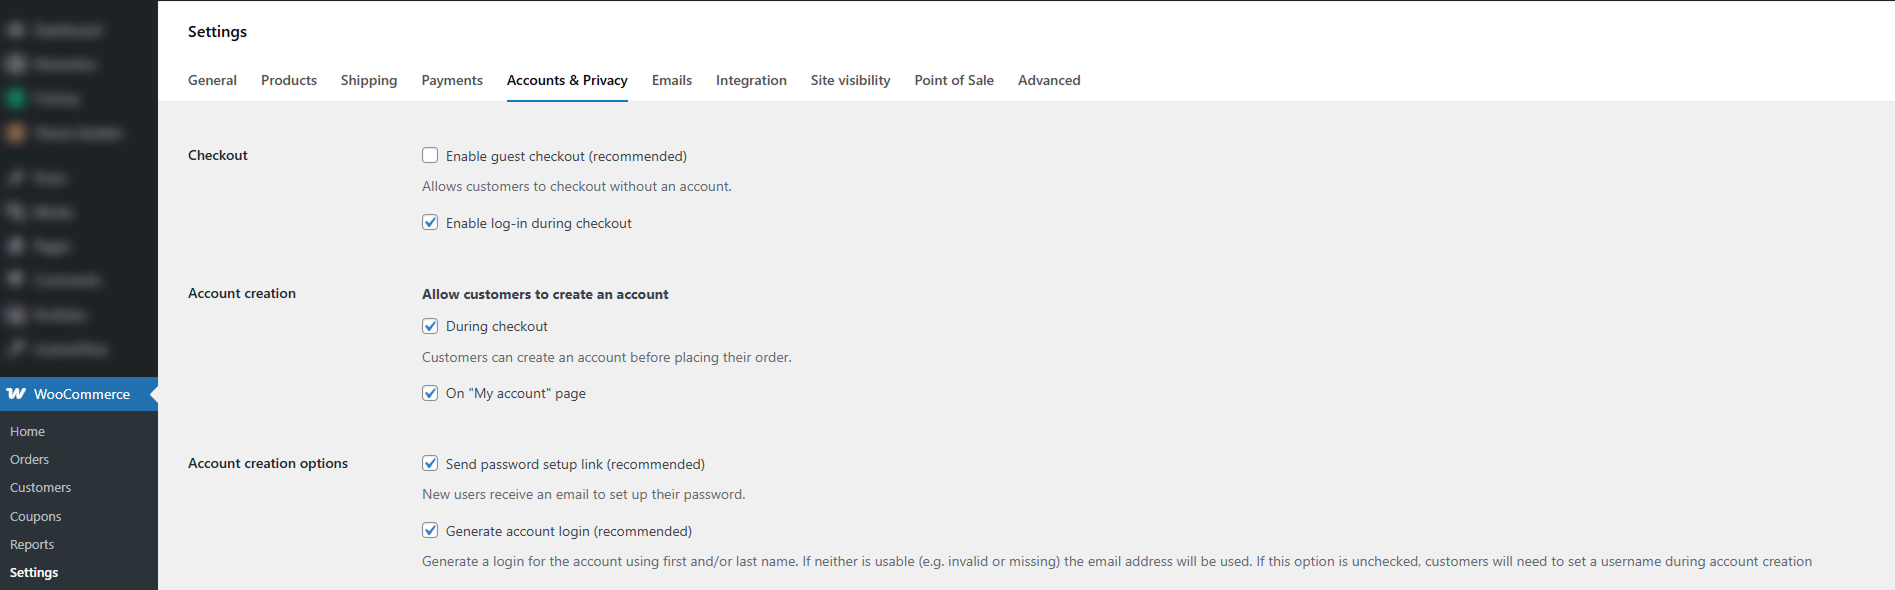
Enable the following options:
Why This Matters: Users can easily create accounts while purchasing, returning customers can log in quickly, and subscriptions can be properly linked to user accounts.
Stripe is the recommended payment gateway for handling recurring subscription payments in WooCommerce.
Payment Methods Configuration
Path: WooCommerce → Settings → Payments → Stripe → Manage → Payment Methods
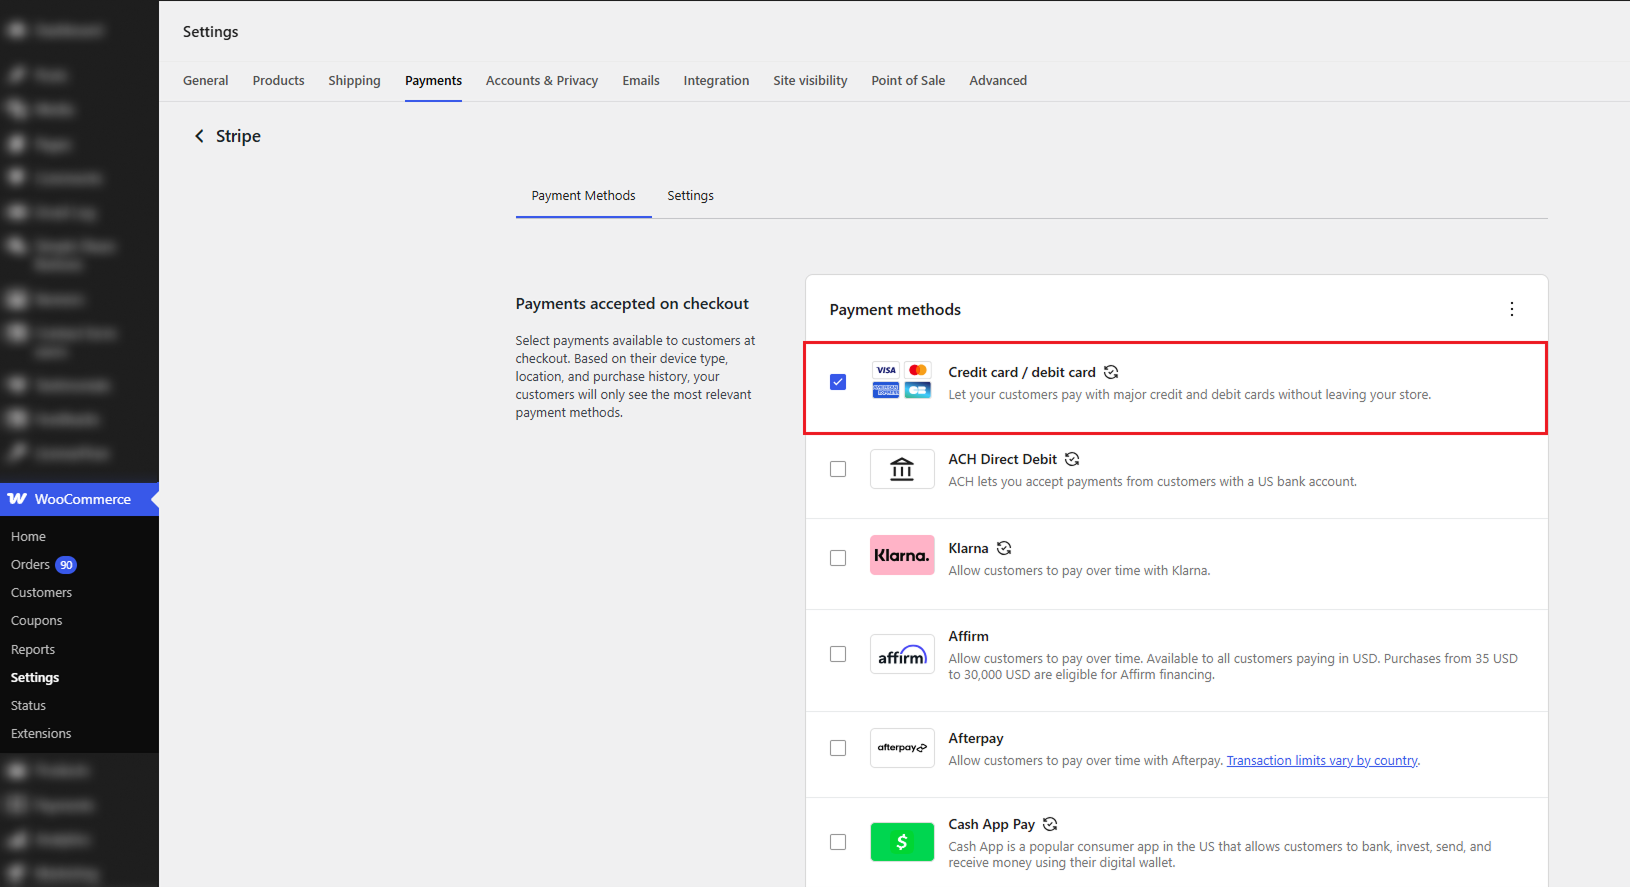
This section allows you to choose which payment methods are available to customers.
Important Note: Recurring payments only work with card payments. Other payment methods may not support automatic renewals.
Why This Matters: Ensures subscriptions renew automatically and prevents payment failures due to unsupported methods.
Stripe API & Webhook Setup
Path: WooCommerce → Settings → Payments → Stripe → Manage → Settings (Stripe API → Webhook Endpoints)
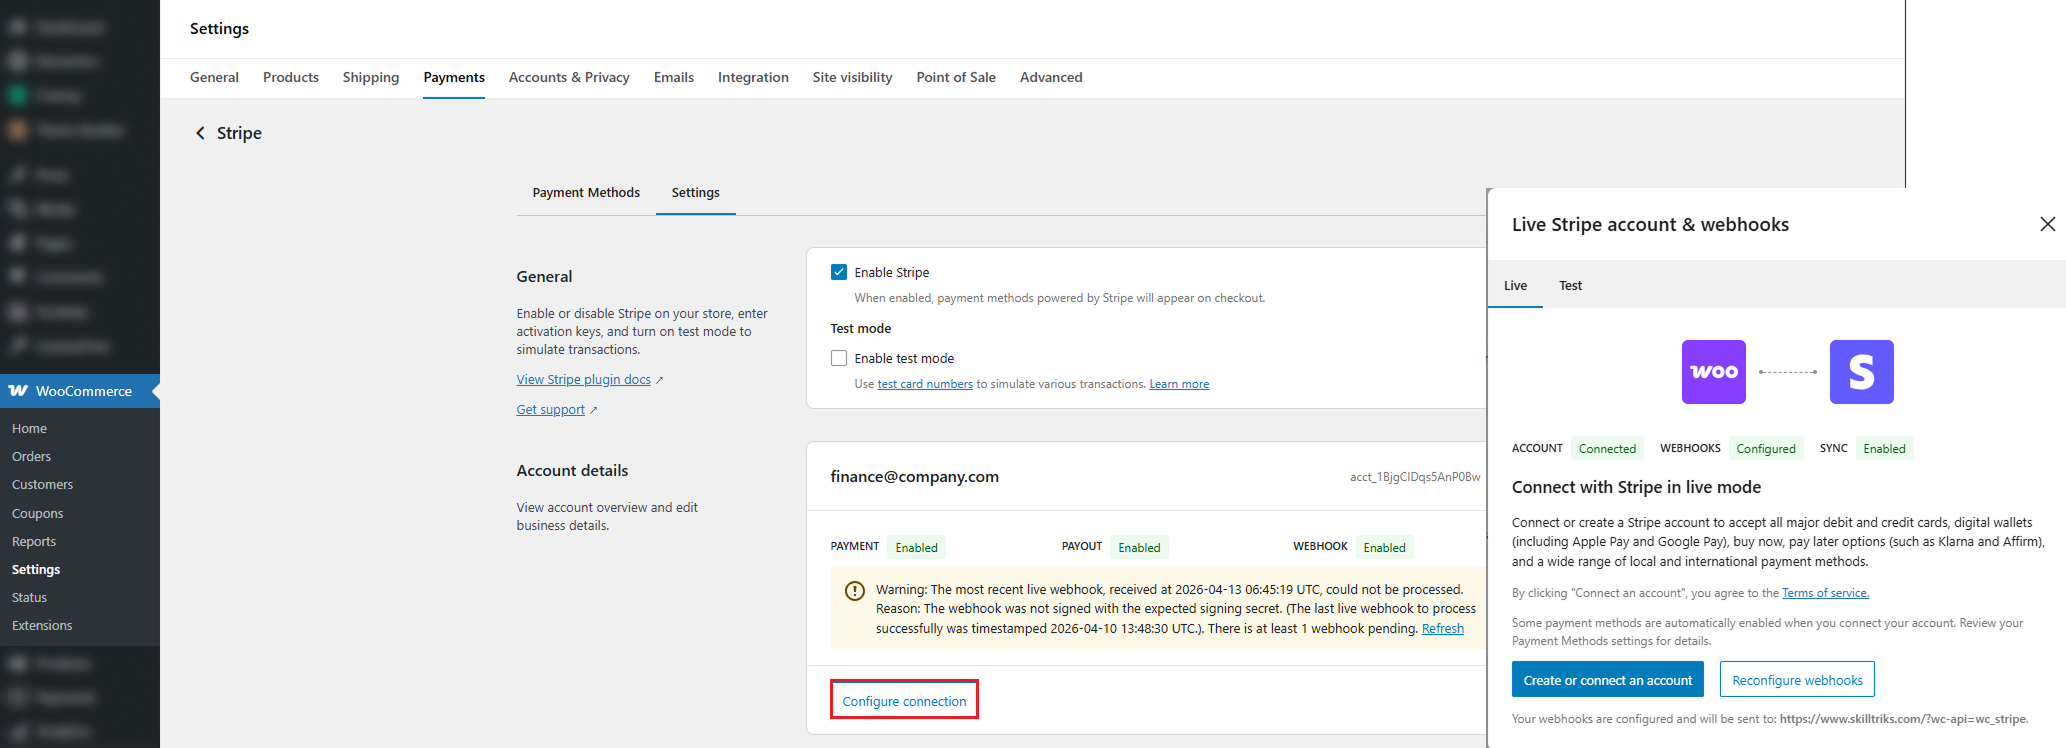
Webhooks allow Stripe to communicate with your WooCommerce store in real time. They notify your store about important subscription events.
Step-by-Step Setup
Required Webhook Events
Why Webhooks Are Important: Without proper webhook configuration, WooCommerce won't know if a payment succeeded or failed, subscription renewals may stop working, and license status may become incorrect. With webhooks configured, payments are tracked in real-time, subscription status updates automatically, and LicenseCommerce can sync license status accurately.
These settings ensure your WooCommerce store is fully optimized for handling subscription-based software products with LicenseCommerce.
In WooCommerce, you can create two types of software products: simple products and variable products. A simple product is ideal when you offer a single plan (e.g., one pricing tier), while a variable product is used when you have multiple variations such as different pricing levels or features.
We will create a simple subscription product with a monthly recurring payment.
Step 1: Add a New Product
Step 2: Configure Product Type
Step 3: Set Pricing and Downloadable File
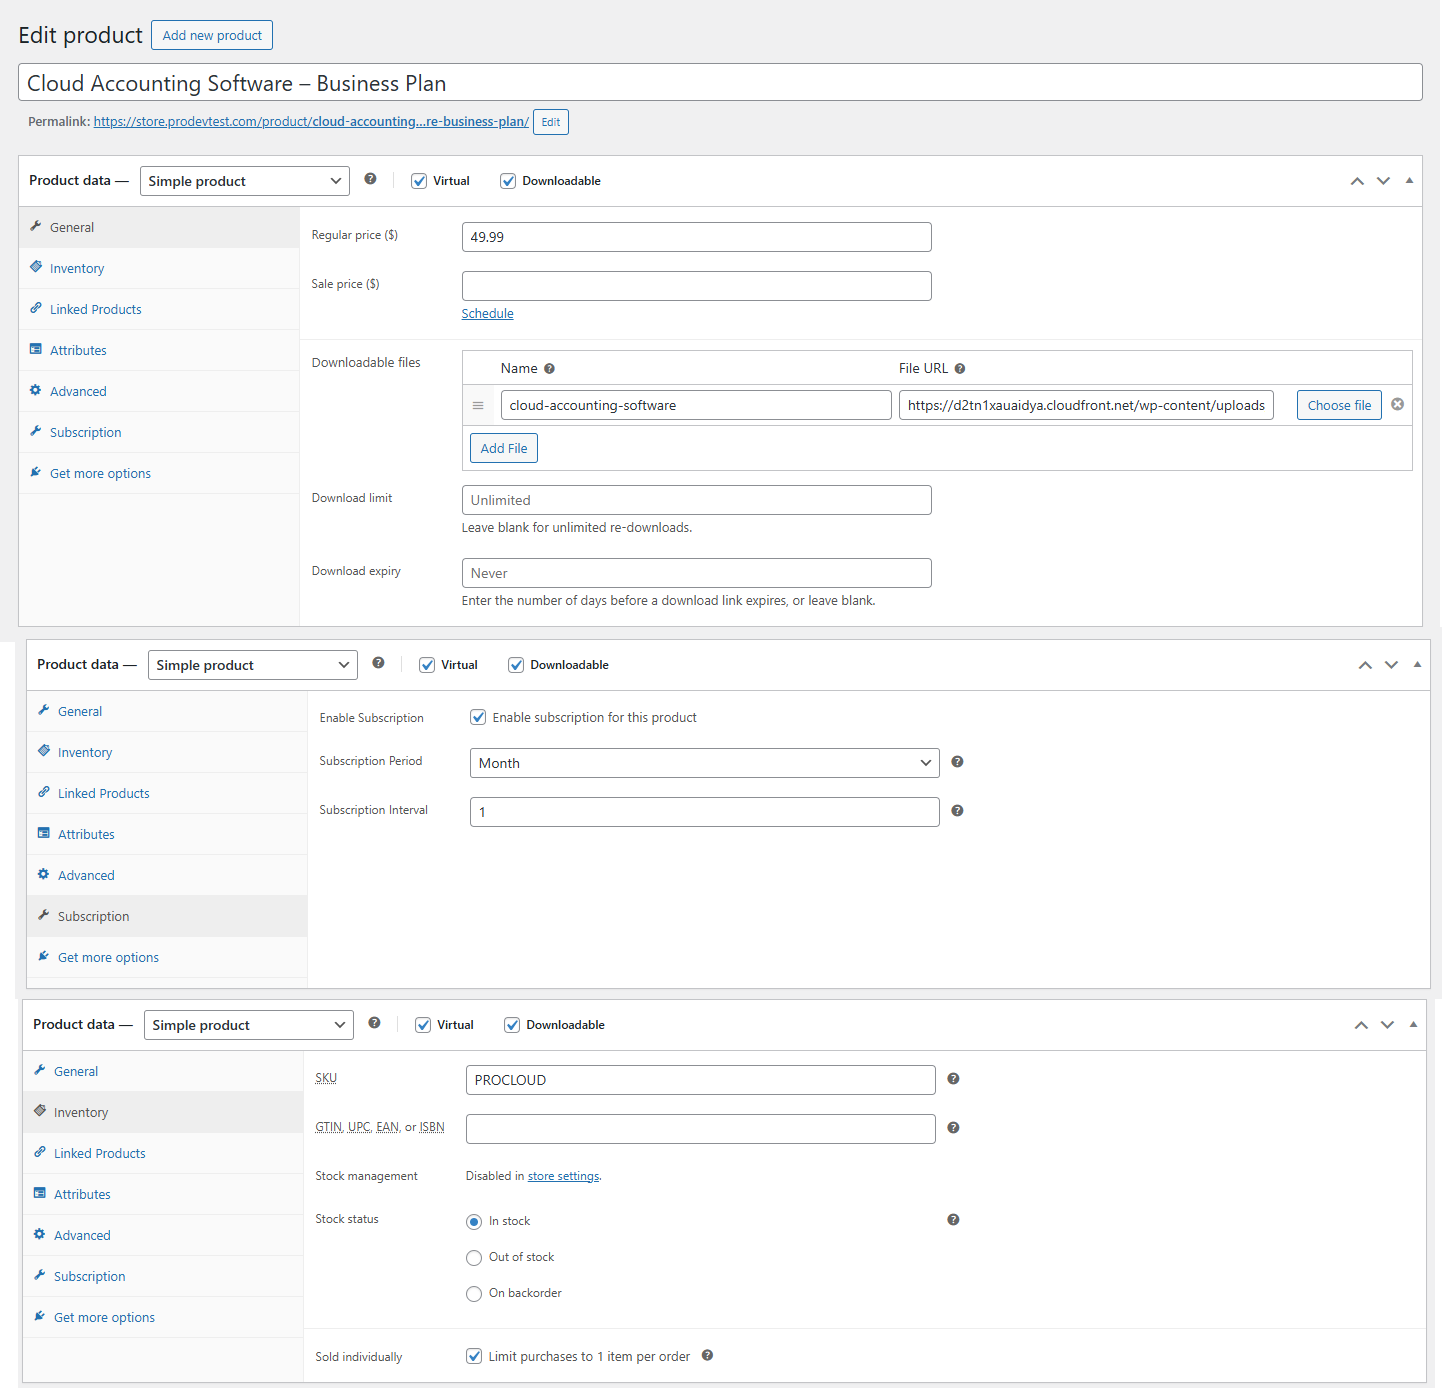
Step 4: Enable Subscription Settings
This means the subscription will renew every 1 month (monthly billing cycle).
Step 5: Configure Inventory (Recommended)
Your simple subscription product is now live. When a customer purchases this product, a monthly recurring payment will be initiated and the subscription will automatically renew every month.
Step-by-Step Guide (Starter Plan Only)
Step 1: Add a New Product
Step 2: Select Product Type
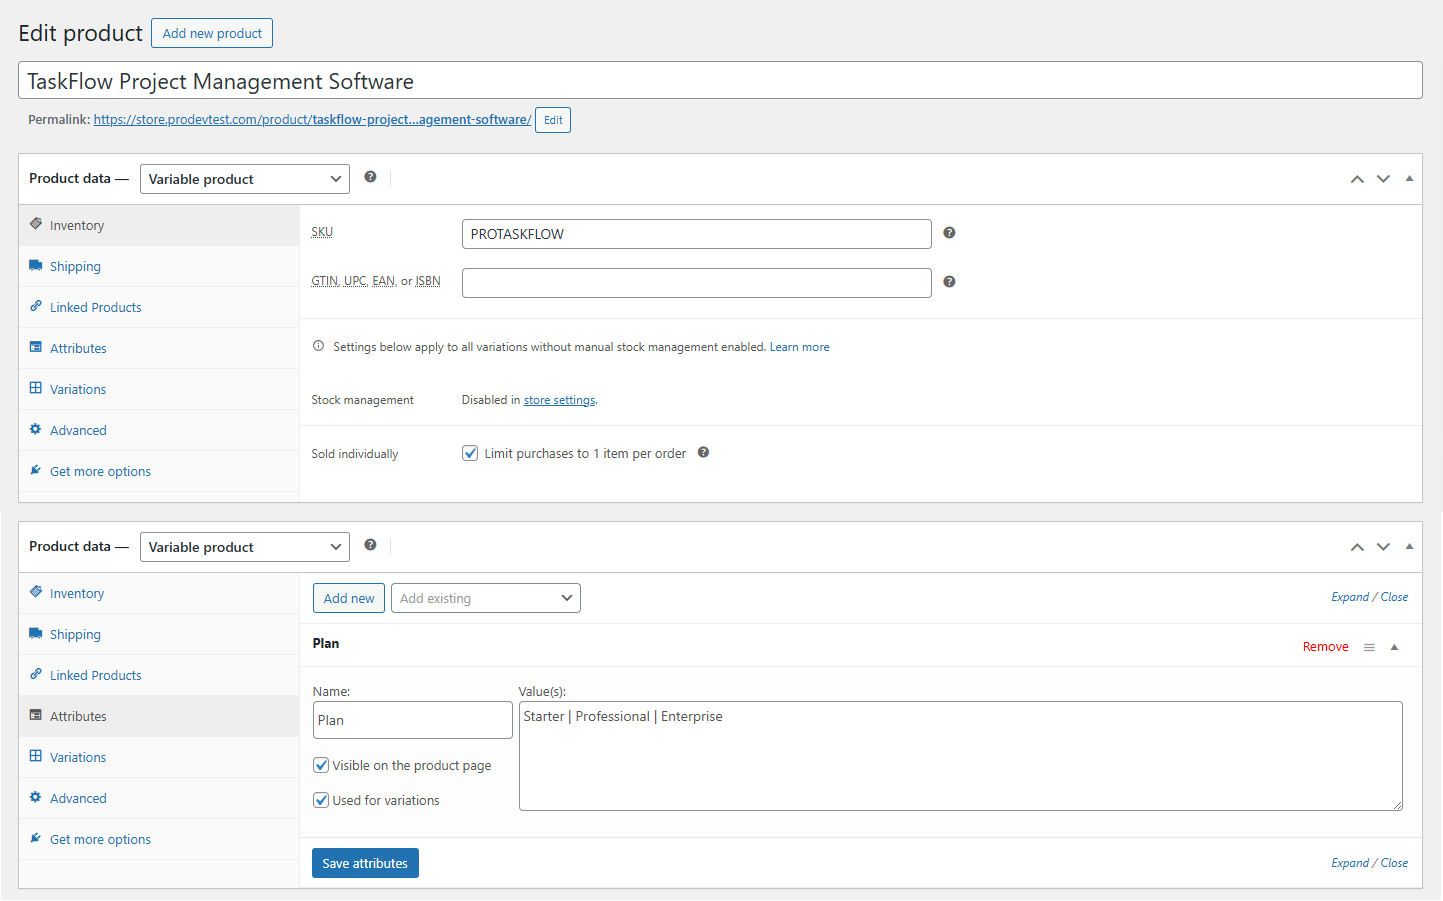
Step 3: Create Attributes for Variations
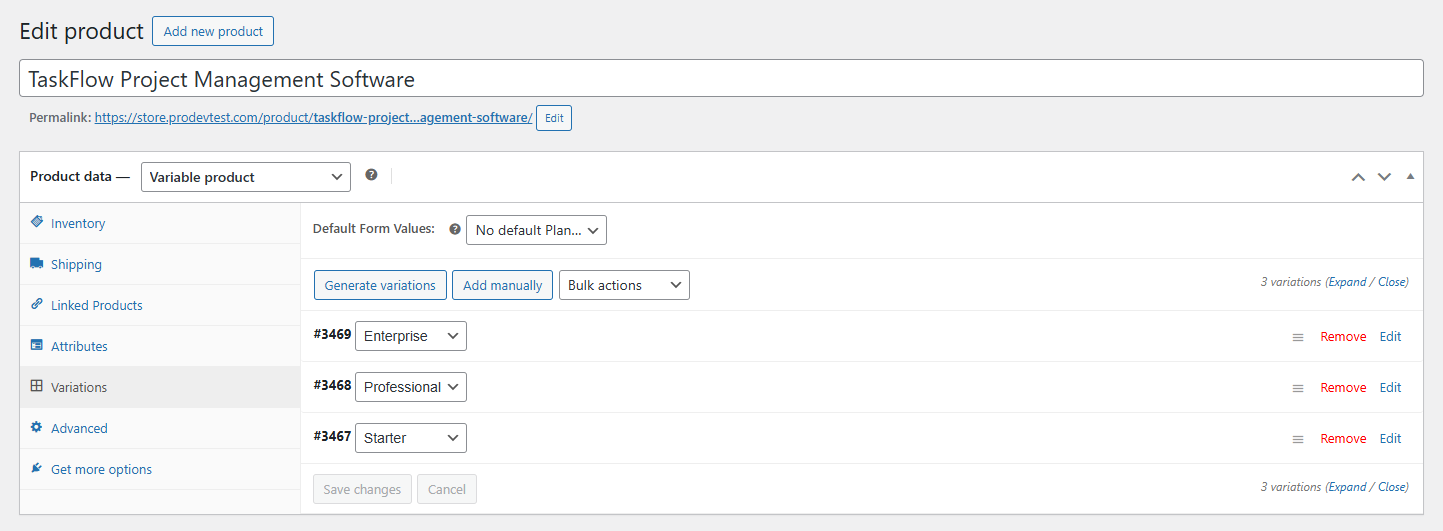
Step 4: Generate Variations
Step 5: Configure Starter Plan (Monthly Subscription)
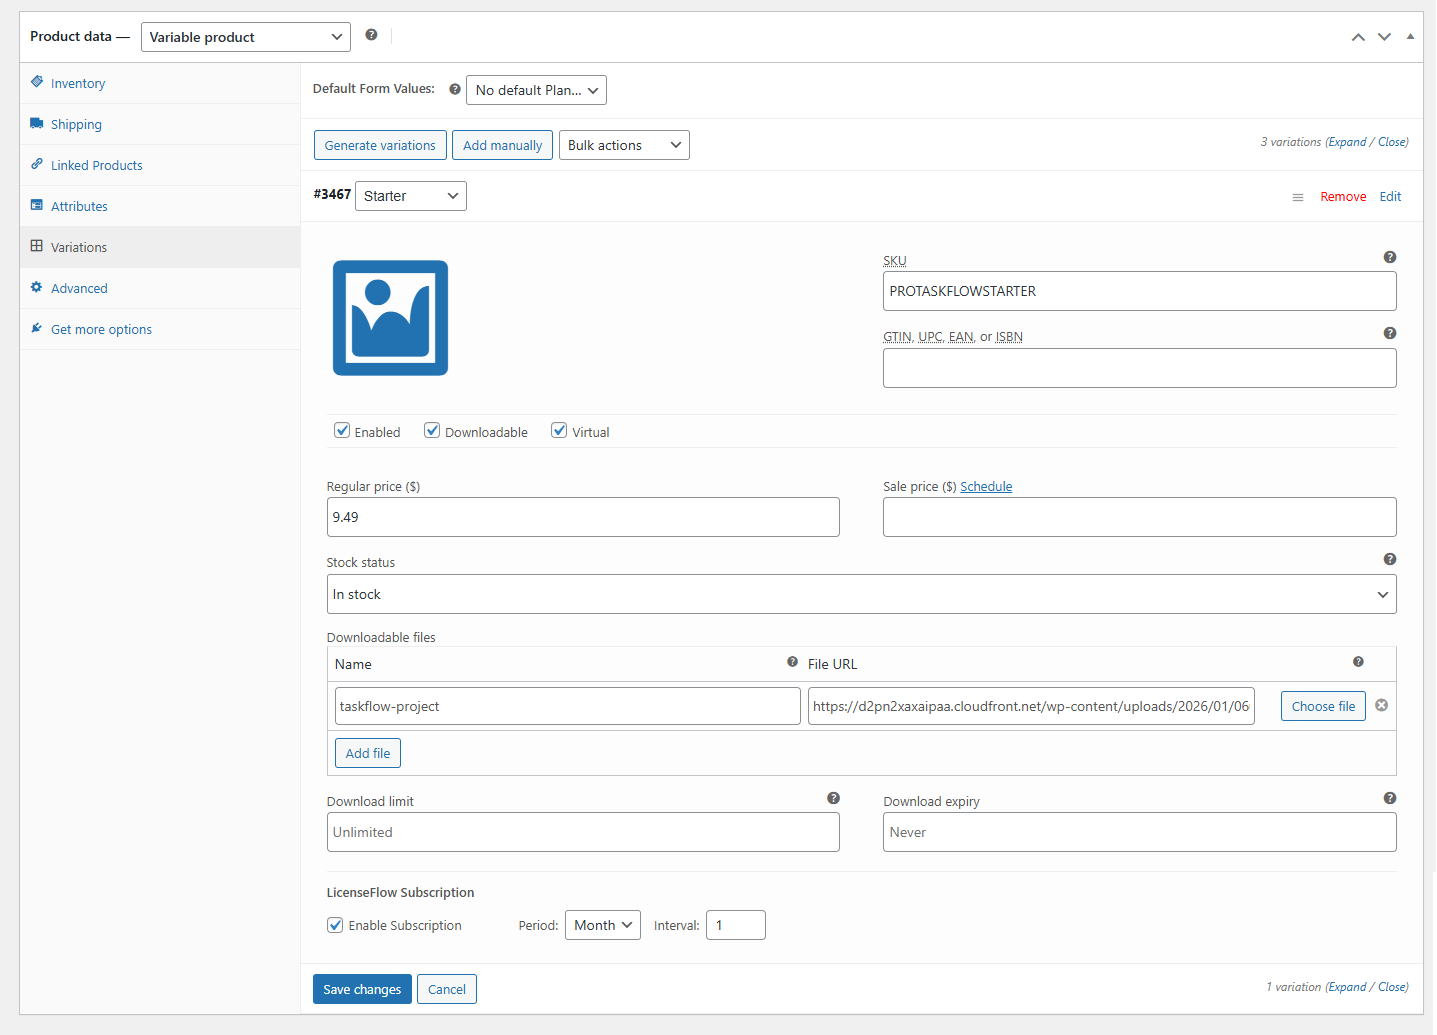
Note: A subscription for variable products on the website will only be created if the LicenseCommerce plugin is installed. The LicenseFlow Subscription option will only appear after the plugin is activated.
Step 6: Enable Subscription for Starter Plan
A variable product with multiple plans is created successfully. The Starter Plan is configured with a monthly recurring payment model. Customers selecting this plan will be billed automatically every month.
We created a product with three plans, each featuring a different recurring payment model:
Each plan can be configured similarly with different subscription periods and pricing.
Max Site Activations lets you control how many websites can use the same license key at the same time. Enter the maximum number of websites allowed for the product or subscription plan. For example, if you set this value to 5, the customer can activate the same license key on up to five different websites simultaneously. Once the maximum number of activations is reached, the license cannot be activated on another website unless an existing site activation is removed or deactivated.
Example: If Max Site Activations = 5, one license key can be active on 5 websites at the same time.
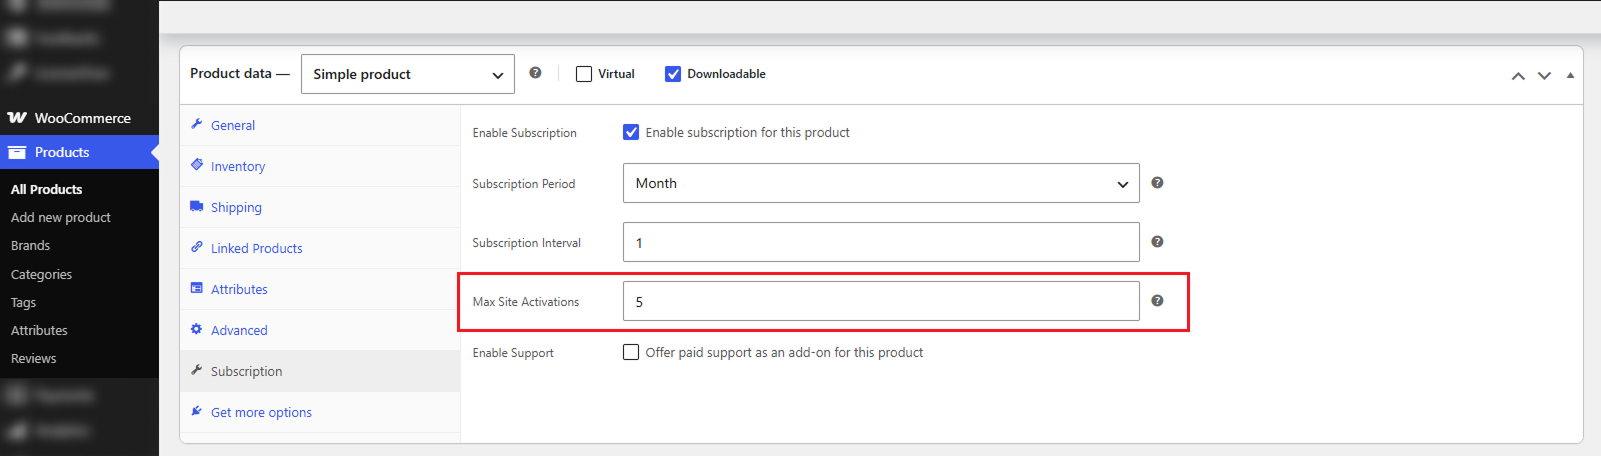
This feature is useful when offering multi-site license plans to developers, agencies, freelancers, or businesses that manage several websites. It allows customers to use one license key across multiple authorized websites while ensuring that the number of active sites remains within the limit you have defined. All activated websites can access the product's licensed or Pro features as long as the license remains valid and the activation limit is not exceeded.
Bundle Support allows you to offer paid technical support as an optional add-on to a product subscription. Customers can continue using the plugin's premium features and receiving product updates without purchasing paid support. They may also receive limited free assistance, such as help with basic questions, general usage guidance, and access to available documentation.
To offer premium support, enable the Enable Support option and enter the recurring support fee in the Additional Support Price field. Customers can then choose whether to add the support plan to their subscription. The support fee is added to the regular subscription price and follows the subscription billing cycle. For example, if the product subscription costs $19.99 per month and the Additional Support Price is $10, a customer who selects support will pay $29.99 per month.
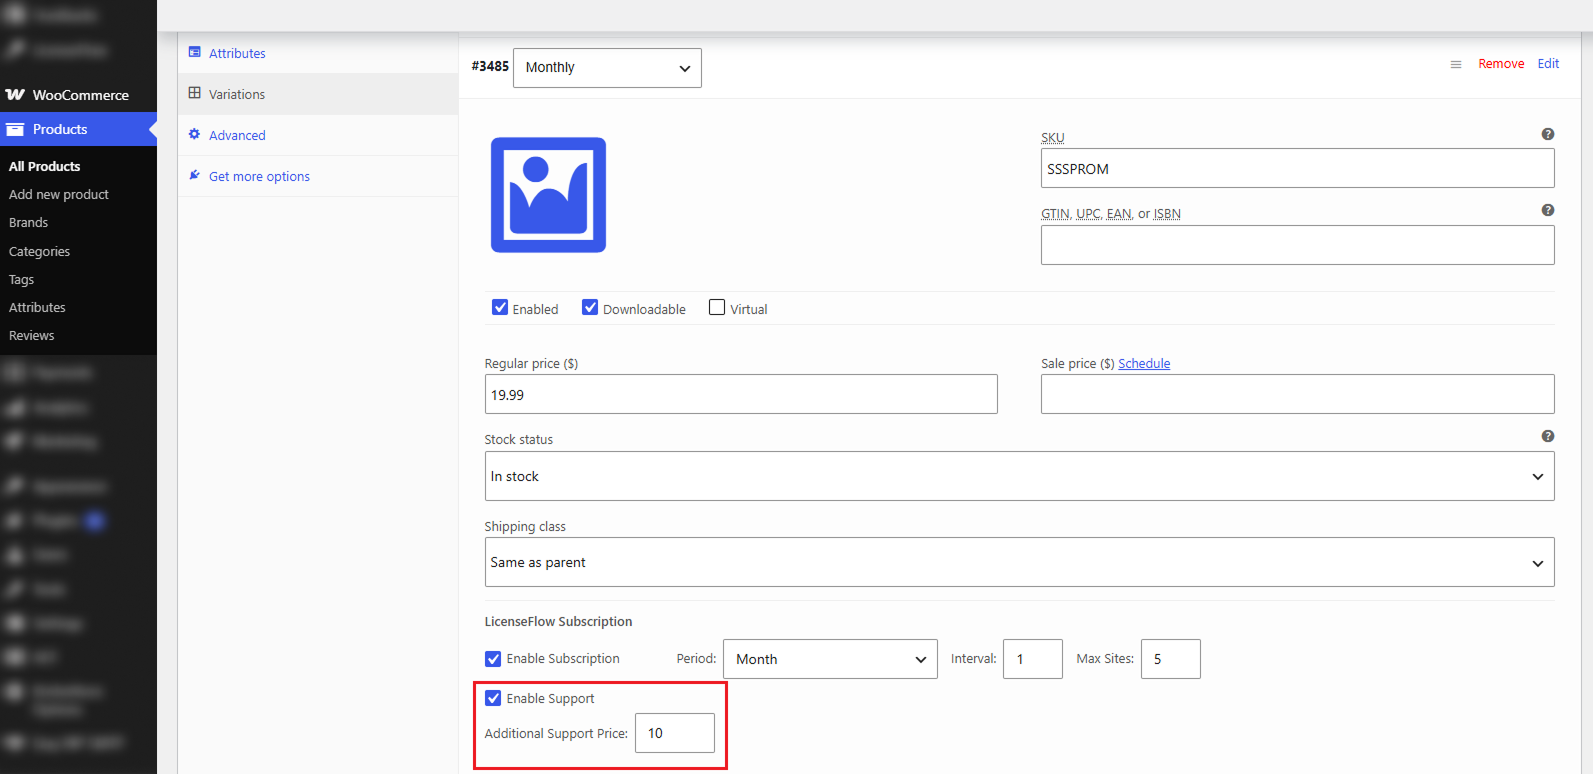
While the paid support subscription is active, customers can receive additional services such as priority ticket handling, faster response times, detailed troubleshooting, installation assistance, issue investigation, and expert technical guidance. If the support subscription expires or is no longer active, these premium support benefits will end, while limited free assistance may still be available.
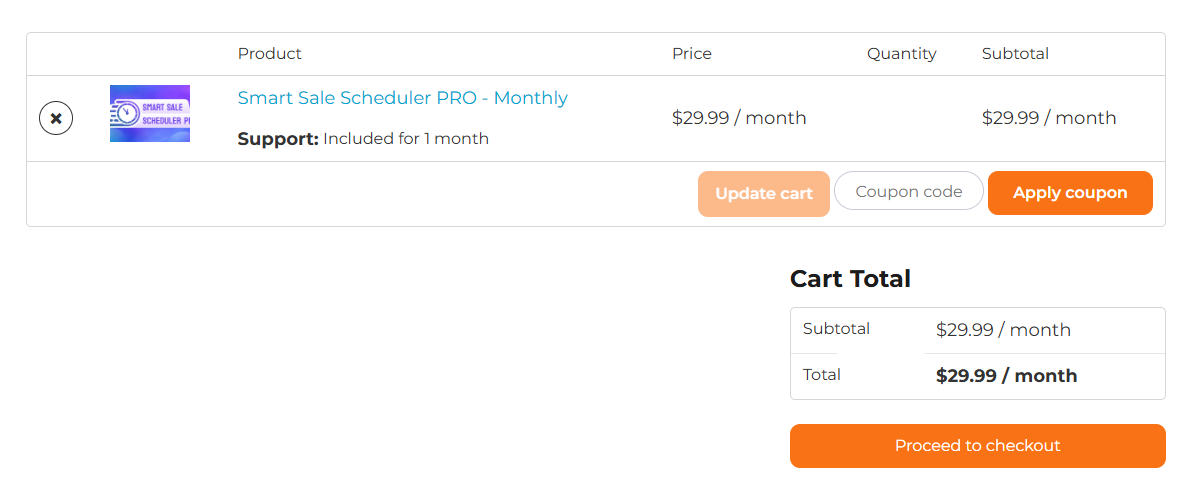
This feature gives customers the flexibility to pay for advanced technical support only when they need it, while allowing you to manage premium support separately from the main product subscription.
The Lifetime Subscription Plan allows you to offer your product for a one-time payment instead of charging customers monthly or yearly. After purchasing a lifetime plan, the customer can continue using the product's Pro features without recurring subscription fees or license renewals. The lifetime license remains active for the lifetime of the product, with access to product updates based on your licensing policy.
To create a lifetime plan, enable Subscription and select Lifetime (one-time payment) as the Subscription Period. You can also use Max Site Activations to specify how many websites can use the same lifetime license at the same time. For example, setting this value to 5 allows the license to be activated on up to five websites simultaneously.
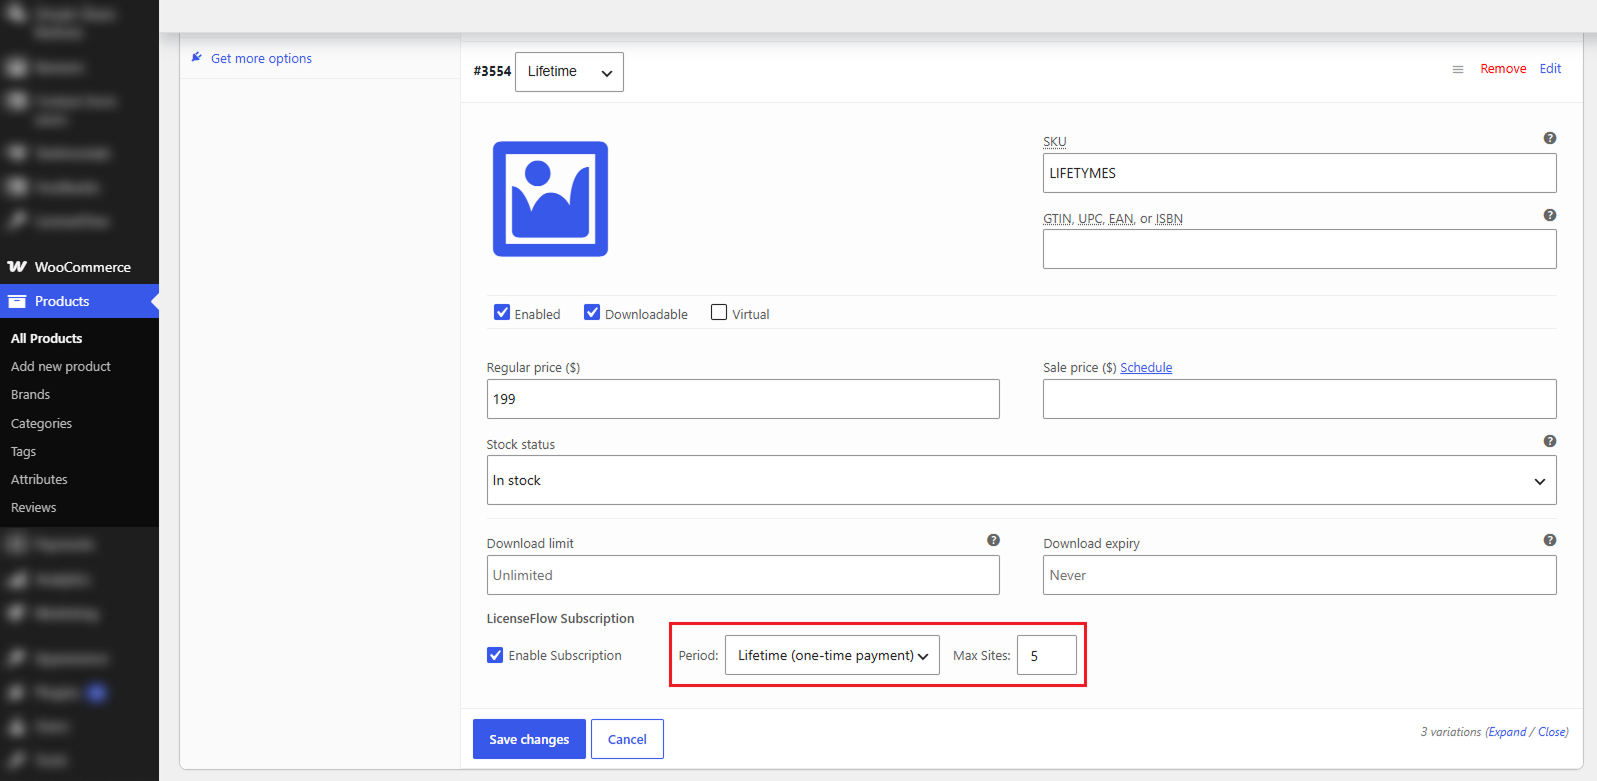
If Lifetime Support is included with the plan, customers also receive premium technical support for as long as the product is supported, without paying a separate recurring support fee. In this case, the regular Enable Support option is automatically disabled because additional paid support is not required.
A Lifetime Subscription provides customers with a simple one-time purchase that can include permanent access to Pro features, product updates according to the licensing policy, and lifetime support when offered — without recurring subscription or support payments.
The Sale Price feature allows you to offer a discounted subscription price during special promotions such as Black Friday, Cyber Monday, seasonal sales, product launches, or other limited-time offers. Customers who subscribe during the promotion receive the product at the discounted price while continuing to enjoy the same features and benefits included with the regular subscription.
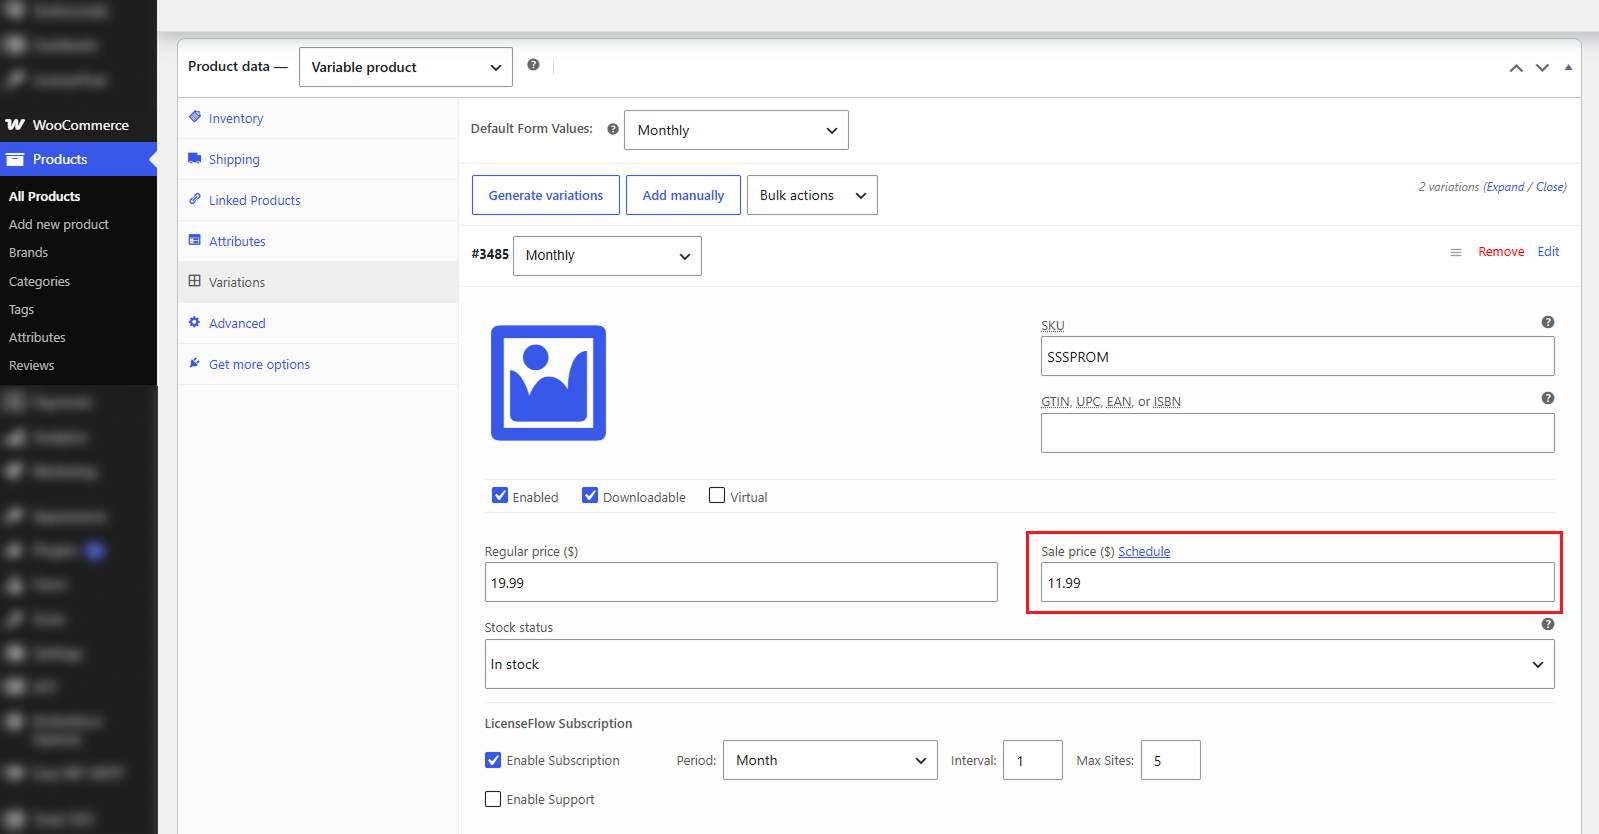
For recurring subscriptions, the promotional price may continue to be used for future renewal payments even after the sale has ended. This allows existing customers to keep the price that was applied when their subscription was originally created.
If you want an existing subscription to use the product's current subscription price instead, open the corresponding order and click Update Subscription to Current Price. LicenseCommerce will update the subscription to match the product's current pricing configuration.
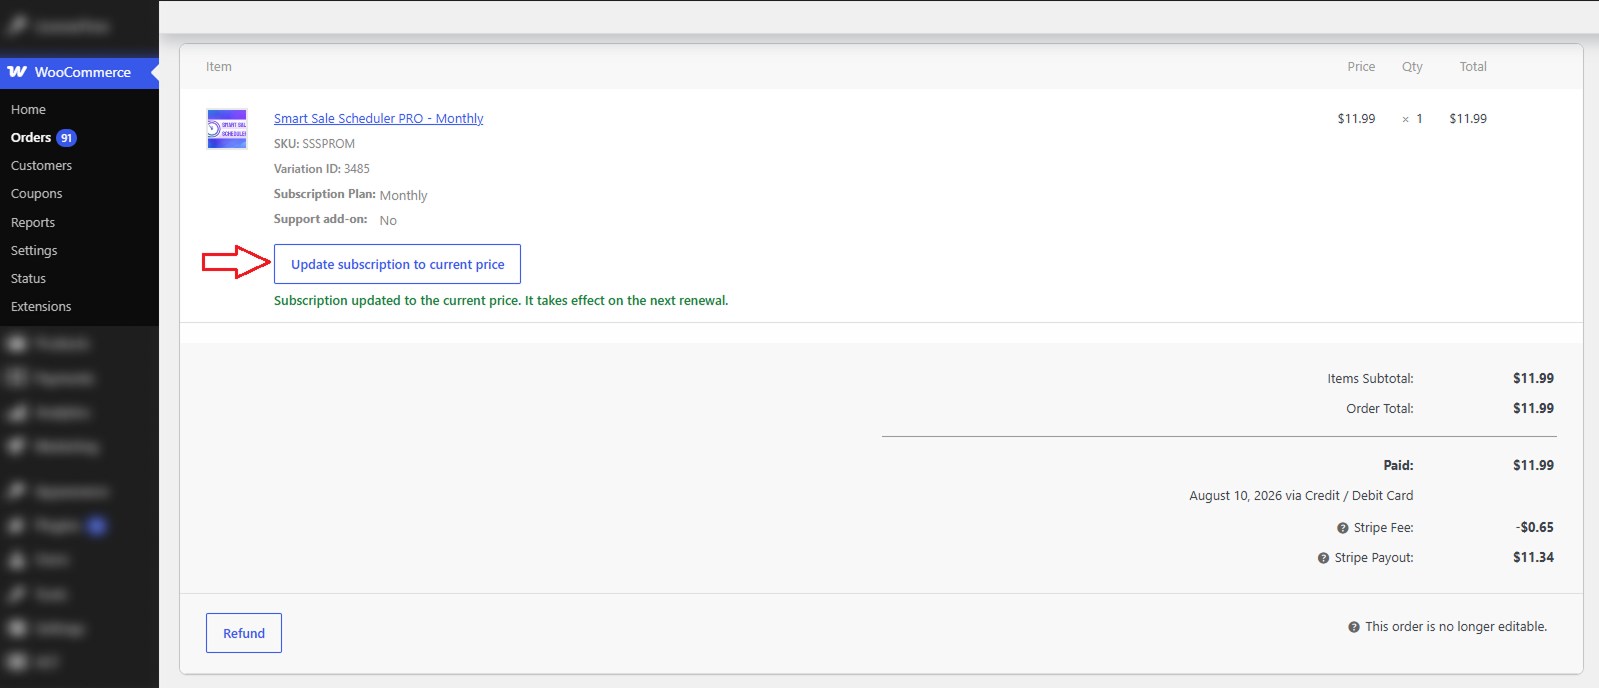
The price change applies only to future renewal payments. It does not change previous payments, completed orders, or invoices. For example, if a customer originally subscribed for $11.99 per month during a sale and the current subscription price is $19.99 per month, updating the subscription will cause the next renewal and subsequent renewals to be charged at $19.99 per month.
This gives administrators control over whether customers keep their original promotional subscription price or move to the product's current pricing.
This section explains how users can purchase a software product, receive a license key, download the product, and install it on their WordPress website. The process is simple and fully automated using Stripe for secure payments and LicenseCommerce for license handling.
Step 1: Purchase the Product
Step 2: Access License Key from Account Dashboard
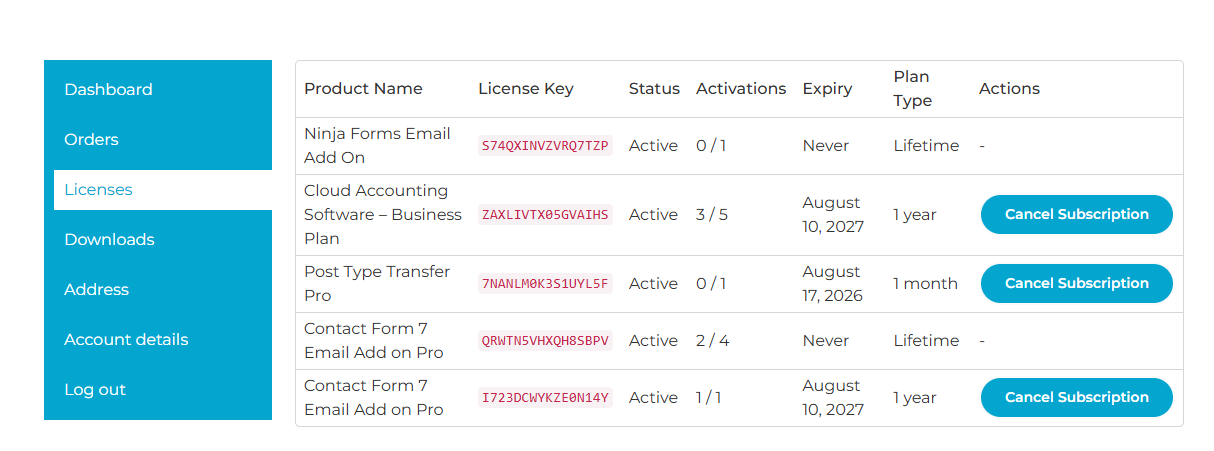
Here, the user can view:
Important:
Step 3: Download the Software
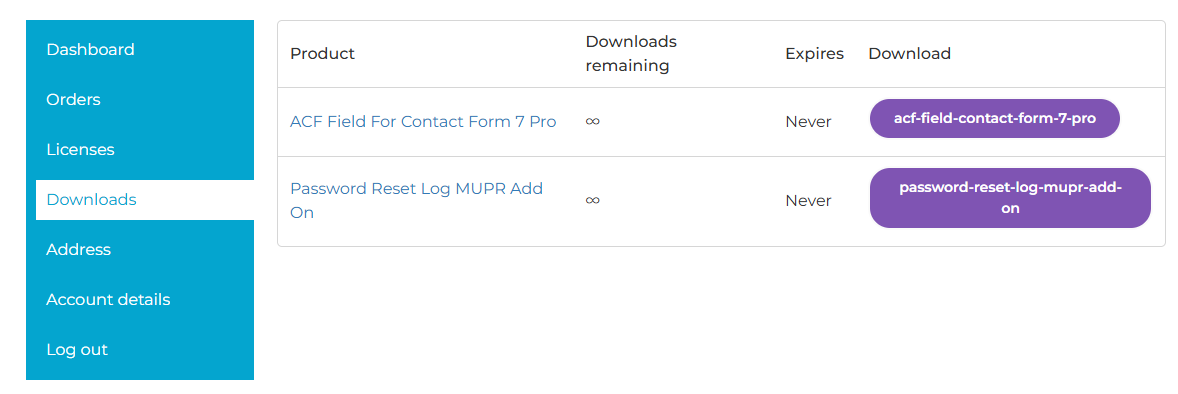
Step 4: Install the Software on WordPress
Step 5: Activate the License
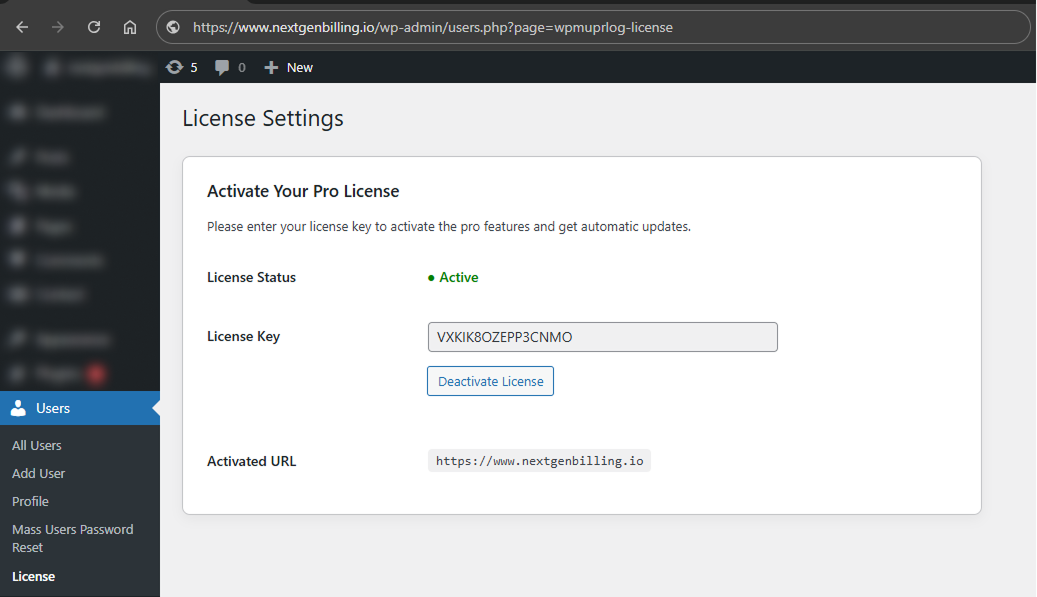
Note: The license section will be available in every plugin that includes license SDK integration, allowing users to activate their license key there.
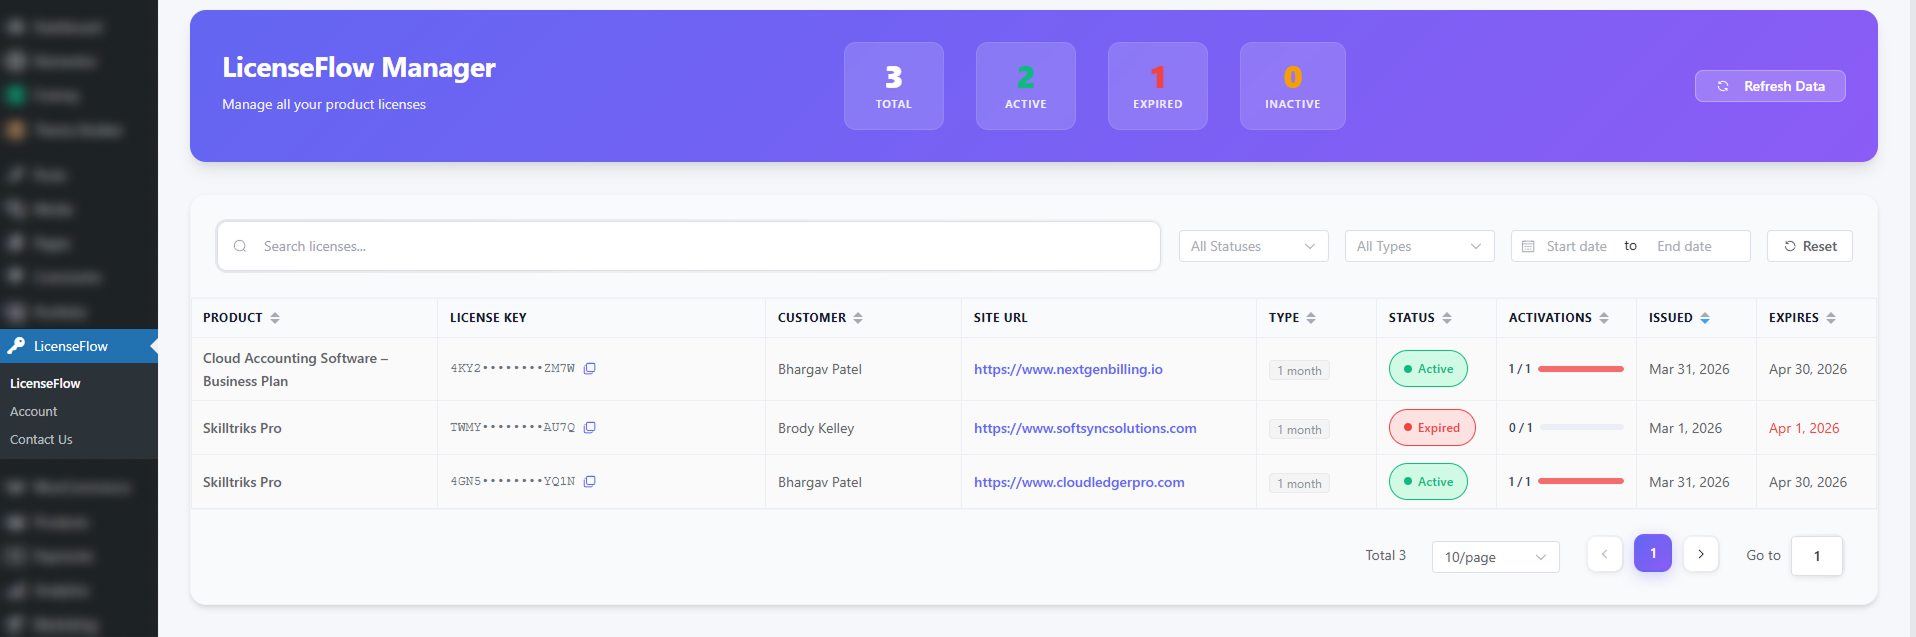
LicenseCommerce Dashboard provides a centralized view to manage and monitor all your product licenses with ease. It highlights key metrics like total, active, expired, and inactive licenses at a glance. Users can quickly search, filter, and track license details, including customers, site URLs, and expiration dates. The clean interface ensures efficient license management and real-time insights.
If you've followed the steps outlined in this guide and still need assistance, please don't hesitate to contact our support team. E-mail us at [email protected] — we're here to help!